Thank you all so much for your lovely comments on the Double Pinwheel String Quilt. I really appreciate your kindness and enthusiasm!
As promised, I am going to post a tutorial for this quilt in several parts, starting today. We'll get the technical stuff out of the way first, making the template for the inner red pinwheel. This is not hard, it just involves drawing lines and cutting. Simple, really.
First, a note about fabric. I'm going to talk about blue fabric and red fabric, because that's what I used, but you can choose your own color scheme, of course. I would recommend Kona cotton for the solid fabrics. As I have mentioned, Candy Blue and Rich Red were what I used. As far as yardage, I am going to estimate you will need about 2-2/3 yards of the blue and 4 yards of the red. What fabrics you use for the string-pieced pinwheels is totally up to you. I used scraps in my stash, cut into 1 or 1-1/2 inch strips, or "strings."
So, here we go!
Part 1 - Making the Template
Let's start by making the template for the narrow inner (red) pinwheel on this quilt. For this, you'll need to make a template out of lightweight cardboard or some other such material. You will be tracing your template onto your red fabric, as I'll explain in Part 2, so it needs to be sturdy enough to trace around multiple times. In this example, I am using cardstock, but you could use the inside of a cereal box, etc.
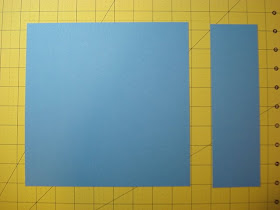
Step 1: Cut a piece of cardstock into an 8-1/2 inch square.

 Step 2: Mark a diagonal line from corner to corner. Cut along diagonal line.
 Step 3: Take one of the triangles you just cut and reposition it on the cutting mat so that the longest side of the triangle is at the bottom (toward you). This long side should measure 12 inches.
Then mark a point 3-1/8 inches from the right-hand corner on the lower edge of the triangle.
.JPG) Step 4: Using your ruler, draw a diagonal line from this mark to the top point of the triangle. Cut along line.
Step 4: Using your ruler, draw a diagonal line from this mark to the top point of the triangle. Cut along line..JPG)
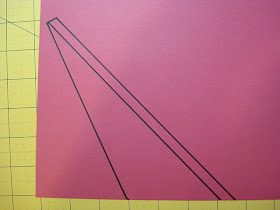
 Step 5: Place the smaller triangular piece you just cut off the right side onto another piece of cardstock, and trace it. Important: Do not flip the piece over that you are tracing. I'm using a different color cardstock here, for illustration purposes, but you can use whatever you have.
.JPG) Step 6: Add 3/8 inch along the right (longest side) of the traced triangle. Draw this line.
Step 6: Add 3/8 inch along the right (longest side) of the traced triangle. Draw this line..JPG)
 Step 7: Mark grain line along the long edge. Trust me, it's important!
 Step 8: Cut out your cardboard template along the outermost lines you just drew.
.JPG) And there you have it--the only template you will need for this quilt! You can get rid of all your other cardboard pieces and scraps except for this one piece.
And there you have it--the only template you will need for this quilt! You can get rid of all your other cardboard pieces and scraps except for this one piece.Next: Part 2 - Cutting and piecing the blue and red units.

Great explanation! Thanks!
ReplyDeleteThis is so exciting that you are doing a tutorial for this quilt.
ReplyDeleteThanks for posting a tutorial. I'll be bookmarking it. This quilt is stunning. Gotta added it to the ever growing list.
ReplyDeleteWoohoo! Very cool! Thanks for putting this tutorial together.
ReplyDeleteI agree, Woo Hoo!!! Now I HAVE to make some time to try these out. Thanks a bunch for sharing!!!
ReplyDeleteLOVE this quilt! I'm going to have to try it!
ReplyDelete