Showing posts with label Memory Quilts. Show all posts

Sunday, December 27, 2020

Second Necktie Project Finished

Yesterday I finished necktie wall hanging number two.  


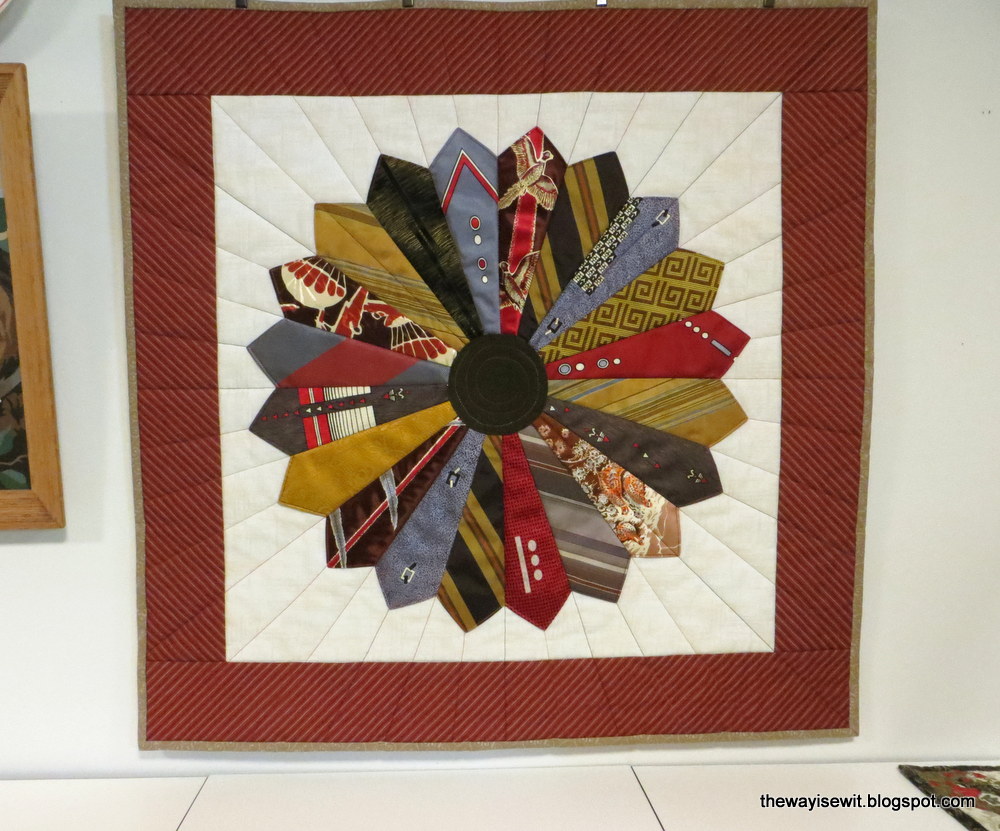
It was inspired by a wall hanging in my entryway that I was taking down a couple weeks ago to replace with a more holiday-themed decoration.  All that Pinterest browsing for necktie projects and the inspiration was literally dangling right in front of my nose!

I had made it from a kit I picked up somewhere in the early days of my quilting experience.  Luckily, I still had the instructions (and homemade templates).  It's dated 2003, so I must have made the original kit wall hanging within a year or two of that.


I had set aside certain other ties to use for a second project while I was working on the first one.  The second project would use different blue and red ties, including the wild blue paisley and red swirly silk ties, which were my personal favorites.


First was to stabilize the fabrics with interfacing, using the Bi-Stretch Lite again.  I have to say the more I worked with it, the more I appreciated this particular interfacing.  It worked especially well on the finicky silks, as well as the poly, acetate, and rayon blends.


Then it was just a matter of cutting everything out.  I had to be judicious about cutting the pieces so as to get the right number from the limited amount of fabric available in a necktie.  

I played around with the layout a while, changed a few things around, and then sewed up the nine blocks.  As far as sashing fabric, I'm really trying to stay out of the stores and heed that little voice in my head that says, "Use what you have."  I auditioned batiks...oh, no.  Black fabric played up the drama, but seemed a little too depressing.  Kept coming back to this silvery gray.  I think it has enough variation in the gray to complement the shimmer of the tie fabrics.  Is it perfect?  No, but good enough.


These pictures are reading more of a pea soup green color in the lower corners of the blocks than they appear in real life.  They're more of a gold, or maybe olive gold color. 


For the quilting, I experimented on a sample with a meander and some other designs, but it reminded me of a quilted bathrobe in texture, and that's not the look or feel I wanted.  So once again, simple straight lines won out.  


I toyed with the idea of sewing a small decorative button in the center of the "tulip" in the gold squares, but then I thought about tie tacks (pins).  If my friend has any of those from her late husband and wants to embellish it, she can give that a try.


This time I had a plan for some of the labels on the back.  I arranged them on the hanging sleeve before I sewed that on the back and stitched them down by machine.

All in all, I'm happy with how it turned out.  I'm not sure if there is another project in me to use the leftovers, but for now I think I'll take a break and do something else for a while.


Saturday, December 19, 2020

Necktie Wall Hanging

Mission accomplished!  The wall hanging from neckties that I was aiming to finish for my friend by Christmas is now done.  I put the final stitches in the binding yesterday.


Then I had the afterthought to hand sew some of the labels I'd taken off the ties onto the back of the quilt.  Many of these ties were from the same local clothing store (which closed some 50 years ago) and of the same brand.  It was neat to see how the brand label had changed through the years, along with the style of tie.


Other than stitching the inner and outer edges of the Dresden to the backing fabric, I relied on the way I was going to quilt it to further secure all the layers together.  I started in the open center circle, stitching in the ditch of each of the blades of the Dresden in straight lines radiating outward, and continuing through the background and into the border.  Like rays, I guess.

(Using painter's tape as a guide.)


I used a variegated Sulky thread in shades of gold, red, and dark brown to echo the shimmer of the ties.  Hard to tell on these pictures, but I like that it's not just a flat-looking thread.  The bobbin thread was Aurifil, and I also used that to ditch quilt the square where the background and border meet.


Finally, I added the center brown circle from the only wool tie in the group.  I had to maneuver around a few holes and thin spots, but found an area of viable fabric to cut the circle from.


Third time's a charm when it came to free-motion quilting that center spiral.  I even drew it in chalk first.  Sheesh!


Normally I don't add a rod pocket to my wall hangings because I use curtain rings to hang them at home, but I added a pocket on this one to keep things easy for the recipient.

Here, in this picture below where I used flash, you get a better sense of the texture of these ties.  They're really smooth, shiny, and silky feeling!


Can you tell the gentleman was an avid outdoorsman?  I love those pheasant and grouse ties (at about the 12:30 and 4:30 positions).  Also, the geometric mid-century graphics on several of the other ones.  And that Greek key.  Okay, I love them all!


I'm going to take a stab at another wall hanging from a different grouping of ties I've set aside, now that I have the hang of this a bit.

Wednesday, June 13, 2018

It's the Little Things

This is absolutely my favorite time of year.  I just came back from a walk and the sky was such a clear blue, the trees and lawns so lushly green, new flowers vivid and bright, the air light and breezy.  What's not to love?
(View from the bike trail a couple weeks ago.)
(Another bike trail view.)
Pollen, I suppose.  Mosquitoes, depending on the time of day.  There are those too, but the good things far outweigh the nuisances most days.

I have been posting regularly on Facebook (mostly family in that group), but I need to catch up a bit here on the blog.  
(Purple martins enjoying the evening.)
Sewing-wise, I've finished up a couple small things in the past few weeks.  These star pillows, from Dad's shirts and ties, got backs made and were stuffed.
I used a denim shirt of Dad's for the back of one.  He was a big man, so his size XXL shirt back was just right for an 18-1/2 inch, envelope style pillow back.  For the other pillow back, I just used a medium brown Kona cotton.
My niece got married last September and my Dad was able to attend the wedding.  She posted a picture on Facebook recently where I noticed Dad was wearing the blue shirt I'd used in the pillows, so I gave her one of them as a keepsake.
I also picked up the memory quilt from Betty, the longarm quilter.  She did a great job with an overall design.
(Memory quilt from Dad's shirts.)
I bound the quilt in the same brown Kona as mentioned above for the pillow back.

As I was tidying up the sewing space recently, I came upon a small pile of bonus half-square triangles.  I thought I'd given the whole lot of these to a friend to whom I'd recently sent a box of orphan blocks.  Yet here were some stragglers that got left behind.
Well, you know how it goes when you start playing with scraps.  Pretty soon I had them laid out, then sewn together, then bordered, etc.  And then I thought it needed buttons, just because.
I call this a procrastination project.  Had other things I probably should have been doing, but following this little bunny trail seemed more compelling.  

Another thing I found while putting things away was an Amish doll quilt flimsy I'd pieced well over 15 years ago.

(Found Amish doll quilt flimsy)
I'd stuffed it way back in a drawer.  I remember being somewhat disappointed in the fact that I'd had to piece the border in two places because the scrap of purple fabric I was using wasn't quite long enough.  And I didn't want to buy more fabric just to finish a silly little doll quilt.  

It makes me chuckle now, remembering that I was bummed about the minor details of having a couple extra seams in a border.  Since then, I've pieced together a lot of borders and know it doesn't matter much at all in the scheme of things.

I also remember getting to the "now what?" point after it was a flimsy.  I didn't have any free-motion quilting skills yet, and the thought of hand quilting felt like too much effort.  So it was put away.

After rediscovering it recently, I decided it deserved finishing.  And so I did.
I used a walking foot and cross-hatched the center part in red thread.  Then I used an older plastic template I had to chalk on an outline for the wavy braid-like border.  I used a vintage turquoise thread from the 1970s called "Super Sheen" (thrifted!) to quilt the border, again with the walking foot.
Interestingly, I had bought that template for an Amish quilter to use many years ago.  She hand-quilted a Smoky Mountain Stars quilt for me and used the same quilting design in the border.

Next in line (maybe) is to finish quilting a String-X quilt that's been basted and waiting for a few weeks already.  It might be aged just enough to start—unless I find another procrastination project in the meantime.   
And did I mention it's my favorite time of year?  There are trails to hike or bike, roses to smell, sunsets to watch...

Sunday, May 6, 2018

Sunday Sundry 5-6-18

Spring has finally arrived, all of a sudden it seems.  Hard to believe that this was the backyard view just two and a half weeks ago.

Now the landscape has transformed into a sea of green, dotted with golden daffodils, dandelions, hyacinths, tulips, etc. 

(Mallards enjoying the new greenery and mud puddles at the park.)
I've done a little raking, some mulching, but no digging in the dirt quite yet (it's been pretty wet).  Looking forward to it, though.

Went for a walk and gained 10 pounds...
 
One glorious spring morning this week, as I hiked through the neighborhood enjoying the bird songs on the warm breeze, I noticed it must also be that time of year when the city crews pick up random household items, the stuff that doesn't go in the usual trash bin.  There were various piles sitting at the curb as I passed through the blocks.  Broken bed frames, pet-ravaged furniture, damaged dressers, ancient plastic flowerpots, etc.

Coming up on my walk in one such pile were a couple of hard-used Coleman coolers and shattered shelving unit.  As I got closer, however, something else caught the corner of my eye.

Sitting on the ground in an open cardboard box were two crocks, a smaller brown one nested inside a larger light colored one.  I stopped and removed the smaller crock so I could hoist the larger crock out of the box, because it looked like it could be—why, yes indeed it was—a Red Wing!

If I had been thrifting in a store, this would have been a "Start the car!" moment—when you find something too good to be true.  Your insides are jumping up and down, but you keep a poker face, play it cool, and make a beeline for the checkout and the safety of your getaway vehicle.

Back at the curb, it was 10 seconds, tops, and I was scuttling back down the sidewalk on my way home, now 10 pounds heavier, cradling a dirty, paint spattered crock.

A quick bath and a couple minutes with a razor blade to remove the red paint (talking about the crock here), it was spiffed up and ready for some "after" shots. 


I was expecting to discover at least a hairline crack or a chip or two, but it was pristine!  Now it's ready for some spring flowers—if I can bring myself to fill it with dirt, that is.  Maybe I'll find a pot that will fit inside.

What I couldn't quite throw away...

I was tidying up in the sewing room the other night when I grabbed what remained of Dad's three ties and took a couple steps toward the garbage can with them.  But then I stopped and laid the silky fabric back down.  Just toss it already and move on.  But am I really done with it?  There isn't much there to do anything with.  It was late, I was tired, so decided to sleep on it.

The next morning, I was still on the fence, but I started playing with the pieces on the table, like a jigsaw puzzle.  I laid out what could be sewn together into a slab of "made fabric" and then started doing just that.  Thinking this was probably an exercise in futility, but at least I'd spend a few more minutes playing with it, and mentally processing, before tossing it out, and maybe that's all I needed to do.

Eventually I had two slabs, each a little smaller than a sheet of paper.  I happened to have a 6.5-inch square ruler on the table and put that down on top of the slabs in various ways, looking through it like a camera lens for an interesting vignette.  

Finally, I cut a square from each slab.  The center of a wonky star, perhaps?  Maybe I could even squeak out some of the star points from the leftover bits from the slabs?

So that's what I did, using Dad's shirt scraps for the blue background and red star points.

And today I made a second one with the other center square from ties, the rest from shirts.  My thought is to make two 18-inch pillows from these big blocks.  I've got a large piece of denim from one of Dad's shirts that will make a great pillow back for one of them.  I'll rustle up something else for the other.

I guess reconsidering the fate of the ties was a good move after all.

There's a chain a-coming...

I also started cutting strips for a Carolina Chain quilt, a Bonnie Hunter/Quiltville free pattern, which can be found HERE. 

Started sewing a couple of these together, just to see how it might go.  Sometimes I have doubts about whether my "lights" and "darks" are going to work together overall.  That ever happen to you?

You wonder, will it be okay or just a beautiful mess?  After putting a few together, I'm ready to trust the process and let things take their course.  So we'll see.

Housekeeping and a boo-boo...

I checked my email subscription list for this blog last week and was surprised to find that during the time I had not been blogging much during the first part of 2018, over 1,000 new email subscriptions had been added.  Why all the sudden interest in this small, semi-neglected corner of the blogosphere, I wondered? 

Turns out, on closer analysis, these seemed to be bogus email addresses all ending in @outlook.com, likely planted by a bot of some sort.  A little maintenance/housekeeping was going to be required to remove these.  The bummer was, I was going to have to delete each and every one of the bogus addresses by hand, all 1,000-something of them.

But I did that over the course of a few days, a few hundred at a time.  Unfortunately, at one point I got a little carried away in the rhythm of it (click delete, enter okay...click delete, enter okay), and I accidentally removed a handful (maybe about 4) legitimate email subscribers.  If you have received this blog post in your email, you were not one of them, so no worries.

However, if you subscribed to the blog by email between February 19 and the third week of April, and you aren't seeing this post in your email, I sincerely apologize and ask that you kindly take a moment to re-subscribe. 

The bogus email subscriptions have no effect whatsoever on legitimate subscribers.  It's just something I need to be aware of and handle on my end if it comes up again.

As always, thank you all so much for reading!

Monday, March 26, 2018

Framed Memory Quilt Block

This is the story of a fairly quick and easy project.  Do you like that word, "fairly"?  Qualifiers aside, it really was pretty simple.

I wanted to make something with Dad's ties, some kind of memory piece.  The thing is, Dad used to have more ties before he retired.  That was over 30 years ago, so at the time he passed away, he was down to only three ties in regular rotation.  With the dress code for church and weddings and funerals being more relaxed these days, he didn't need any more than that.

And he was a clip-on tie kind of guy.  Always.  He was all about simple solutions.

First I hand-washed the ties in Woolite, and when they were dry, took them apart.  Turns out once you cut the knot off, there's not a whole lot of fabric in a clip-on tie when it comes down to it.  Therefore my project, whatever it was, would need to be small because of the limited resources (and variety) of three clip-on ties.

Ties are cut on the bias, so I fused a lightweight interfacing onto the backs of the pieces to stabilize them.

This block, which I saw on Pinterest, was my inspiration.  Unfortunately, the link did not lead to any information on the maker.  If anyone recognizes it, please let me know so I can give credit.  

My thought was to feature the tie fabric in the center star.  I have three siblings, so I could use a different tie for each block, along with some of Dad's shirt scraps left from the memory quilt.  And then I'd frame each block and give one to each of my two brothers and sister as a memento.

I was thinking of a shadow box style frame without glass, but that wasn't easy to find.  Something square, not rectangular, larger than 6 inches but smaller than 10, that didn't cost an arm and a leg.

Then one day while shopping at Dollar Tree, I saw these square signs.  Thought I might pop out the glass and be able to use the frame for my project.  The price was right, a buck, so I bought one to experiment with.  Well, it turned out the glass was glued in with some kind of super-tough epoxy that my razor blade could not budge! 

Plan B:  Leave the glass in place and try scraping off the lettering with the razor blade.  Bingo!  A couple minutes later, the lettering was gone and I had a 7.5-inch square frame for my block.

The next step was to make the block.  Figured the easiest way to do it was draw up a paper piecing pattern.  

The block consists of four identical sections joined around a 2.5-inch center square.  There's a partial seam involved in sewing the block together, but that's not difficult.  The hardest thing for me was remembering how to paper piece!  I did have to un-sew a few seams on the first attempt, but then I got the hang of it.

(I would be happy to share the paper piecing pattern, crudely hand-drawn as it is, but I don't know how to insert a PDF download link.  If I figure that out, I may come back and edit this post.)

To insert the block into the frame, I bought a piece of black foam core board at the dollar store and cut it to about 7-3/8 inches square. 

Used a few dabs of washable glue stick to help center the block on the board, and then gently pushed it into the frame.  It fit just right, not too loose or too tight.  I could seal it in place with a bead of hot glue, but for now I'm okay with leaving it as is.  It seems stable enough.  And I like the option of being able to remove it easily, if you want, from the frame.

Finished blocks.

I ended up making four, so I can keep one.  I used the one of the ties twice, but a different part of it, so the center stars don't look the same from one to another.  

That's how it all came together.  Fairly simple, right?