We're in the homestretch!
 Heading for the finish line on the Double Pinwheel String Quilt!
I had to Google how to spell homestretch (one word or two), and it's a racing term, of course. Did you know the Kentucky Derby happens next Saturday? I did not. Want to test your knowledge of the Kentucky Derby? Click here for a quiz. I got 5 of 10 correct, which is funny because I guessed at every single one.
Back to DPSQ:The Final Chapter. Let's sew this thing together, already!
 We will be making 16 large pinwheel blocks, each consisting of four of the block units that you made in Part 3.
Step 1: Take four random block units that you made in the Part 3, and arrange them into a pinwheel.
Sew the top two block units together, then the bottom two. Press seams toward the red pinwheels. Since the paper has been removed and there are no more bias edges to worry about, I used a steam setting on my iron at this point, being careful to press gently and not stretch the pieces.
Step 2: Sew the two 2-unit sections together to make a block. Again, you will be pressing seams toward the red pinwheels, but first I am going to tell you how to do a little trick in the center of the horizontal seam you just sewed to make it lay flat. Working on the back of the block, unpick 2-3 threads in the center on two of the seams, and open the center (you should see a tiny pinwheel in the center). Finger press this area flat, then gently press with your iron on both the front and back of the block.
 (Back of Block)
TIP: When sewing your two block units together in Step 1, don't backstitch the ends that will be in the center of the pinwheel block. You'll be less frustrated when you have to unpick a couple threads there in this step. Ask me how I know.
Repeat Steps 1 and 2 for all blocks. You will end up with 16 pinwheel blocks, each 15-1/2 inches square.
 Step 3: Cut sashing strips and outer border from your remaining 3 yards of red fabric as follows:
- Cut 10, 1-1/2 inch strips x width of fabric (WOF).
- From the 10 strips you just cut, cut 20, 15-1/2 inch segments. These will be your vertical sashing strips between the pinwheel blocks.
- Cut 4, 1-1/2 x 68-inch strips from LENGTH of fabric (LOF). These will be your horizontal sashing strips, above and below your rows of blocks. Your rows will be approximately 65 inches across, but we'll cut the sashing strips a bit longer and trim as needed.
- Cut 4, 6-1/2 x 85-inch strips from LENGTH of fabric (LOF). These will be your outer borders. Again, we're cutting them a bit longer than necessary.
Step 4: Arrange blocks into four horizontal rows of four blocks each. Sew each row of blocks together with vertical sashing strips between blocks and on left and right ends of row as follows (where |=vertical sashing strip and X=pinwheel block):
Now, cut me some slack here; I don't have any other program (that I comprehend) to illustrate this, so you get my mad Paint grafik skilz.
 Press seams toward red sashing strips.
Step 5: Sew long horizontal sashing strips between each row and at top and bottom as follows (where ------- = horizontal sashing strip):
 Press seams toward red sashing strips.
Step 6: Cut 8, 2-1/2 inch strips x WOF from blue fabric for inner border. Join two strips end to end with a straight 1/4-inch seam. Press seam open. Repeat this with remaining strips so that you have 4 long, 2-1/2-inch strips for inner borders.
Step 7: Attach a blue border strip to the left and right sides of quilt top. (You all probably know how to measure for and attach borders, so I won't go into detail about that here.) Press seams toward blue border. Then attach a blue border strip to the top and bottom of quilt top. Again, press toward blue border.
Step 8: Attach red outer borders in the same manner as Step 7, i.e., to the left and right sides, then top and bottom. Press toward red border.
Step 9: Layer with backing and batting; quilt and bind as desired.
There's one more important step: Stand back and admire your beautiful quilt! Hooray! You deserve roses!

Anyone for a mint julep?
* * * * * * * * * * * * * *
Questions, comments, noted errors/omissions? Let me know, and I'll do my best to clarify.
Guess what got delivered yesterday?
 Oh, the irony.
This is my favorite part--the part where we piece the string units of the Double Pinwheel String Quilt. The part I actually did in between the other parts because I liked it so much. The relaxing and fun part. Have I used the word "part" enough in this paragraph? Part, part, part, part. Okay, I think so. Part.
Basically, you just sew, flip, and press until your paper is covered.
Paper? Yep, we're going to piece these on lightweight paper, which will be removed later while you watch Pride & Prejudice for the umpteenth time--or maybe that was just me. Phone book pages work great for this.
What kind of fabric for the strings? Anything your heart desires, just keep it 100% cotton. I used scraps. I think the beauty of string piecing is in the randomness. That means if you're an overthinker like me, you get permission to dial down your brain and just grab and go.
 Let's get this party started!
Step 1: Cut a variety of fabrics into strips, or "strings." (I'm going to use those terms interchangeably here). Your strings should be between 1 and 1-1/2 inches, generally, just make sure each string is a uniform width from top to bottom. We are going to sew the strings on straight, not wonky. (Nothing against wonky; I just have a feeling it wouldn't work well here. If you try it and it rocks, by all means, let me know.)
Step 2: Grab your phone book and carefully tear out 32 pages. Trim each page to 8-1/2 inches square.
Step 3: Take one of your strings and place it right side up in the center on the diagonal of the paper. To keep it from shifting when you sew on the next string, pin along the left edge of the center string. This is probably the only pinning you'll need to do, just on this center string before you sew the first seam.
 Step 4: Take a second string and place it face down (right sides together) on top of the center string, matching the right edge. Cut your fabric strip so it extends just a bit beyond the paper where you'll be sewing it on. Using a 1/4-inch seam, sew through both fabric and paper along right edge.
 TIP: Use a shorter than usual stitch length when sewing the strings. This perforates the paper closer together and makes removing it easier. Backstitching at the beginning and end of your seam also helps keep the stitches from loosening at the edges when the paper is removed.
Step 5: Remove the pins on the center strip. Open the strip you just sewed so the right side is up, and press seam with a dry iron (no steam).
Step 6: Repeat this process on the opposite side of the center strip. Add a strip, stitch, flip open, and press.

 Continue adding strips until the paper is completely covered.
 Step 7: Turn fabric-covered square over and trim to 8-1/2 inches square, using the paper as a guide.


Step 8: Cut your string-pieced square in half, on the opposite diagonal as the strings are pieced, from corner to corner. Your ruler should be at a right angle to your seams, in other words.

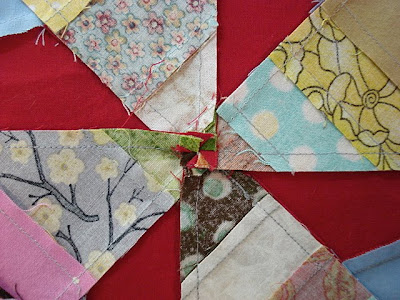
 You will end up with 64 string-pieced triangles. Aren't they pretty?
Now we're going to sew the string-pieced triangles to the blue and red units we made in Part 2. Leave the paper on yet for the next step. It helps stabilize the seam you are about to make.
 Step 9: Pin a string-pieced triangle and a blue and red unit, right sides together, along the long edge of the triangles. This is a bias edge on the blue and red unit; try not to stretch it as you're pinning. Stitch.
 Press seam toward blue and red unit.
 Step 10: Remove paper from back.
TIP: It helps to fold the paper back against the stitching lines before gently tearing it away, like removing a check from a checkbook. This is a good project to do while watching TV, pretending to listen to your spouse or kids, etc. Not while driving though. Or bathing.
 Step 11: Trim each one to 8 inches square.
TIP: Position the unit for trimming on your mat as shown, and trim the red pinwheel side (right side) first, then the lower edge. For some reason, this seemed to work best.
 When you're done, you should have 64 of these for your quilt.
Next: Part 4 - Putting it all together!
This is the second part of a tutorial on making the Double Pinwheel String Quilt. Part 1 can be found here. There will be 4 parts (I think) in all.
Now that we have our template, we're ready to start making the blue and red units.
Let's start with the BLUE FABRIC:
You will need a total of approximately 2-2/3 yards of blue fabric for this quilt, including what we're cutting today and the blue border later on.
Step 1: Cut 32, 8-1/2 inch squares from blue fabric.
Step 2: Cut each square on the diagonal into 2 triangles. (Seem familiar? This is going to be just like Steps 2-4 of Part 1, except that we're cutting our blue fabric to proper size, and we're going to use the other part of the triangle.)
 Step 3: Take one of the blue fabric triangles you just cut and reposition it on the cutting mat so that the longest side of the triangle is at the bottom (toward you). This long side should measure 12 inches.
 Mark a point 3-1/8 inches from the right-hand corner on the lower edge of the triangle.
 Step 4: Position your ruler from this mark you just made, to the top point of triangle (Point A to Point B in photo). Cut along this diagonal line.


This time, we will only be using the larger portion on the left as our blue subunit. The small triangular pieces you cut off from the right side can be discarded or saved as scraps for another project.
 Repeat this for all blue squares, cutting each square into 2 triangles, then trimming each triangle as above into a subunit. You will end up with 64 blue subunits.
TIP: Arrange all your blue squares right side up before cutting diagonally into triangles; also keep all your trimmed blue subunits right side up and oriented in the same direction, i.e., just as you trimmed them. It's easy (at least for me) to get confused if you start flipping pieces over.
From the RED FABRIC:
You will need a total of about 4 yards of red fabric for this quilt. Tracing the template for the inner pinwheels will require about 1 yard; the remaining 3 yards will be used for sashing and borders.
We are going to trace the template (made in Part 1) onto red fabric. However, there are a few KEY THINGS TO KNOW BEFORE PROCEEDING:
- Do not flip your template piece over when you trace. All red pieces are traced with the same side of the template facing up--the side that you marked with the grain line in Part 1. You may want to write "This Side Up" on your template to remember not to turn it over to the other side when you trace it. If you do flip it, your red piece won't fit your blue piece when it's time to sew them together.
- Red fabric should be traced with right side of fabric up. If you normally cut your fabric doubled with the fold along the edge, you will need to cut along the fold of 1 yard of the red fabric and stack both pieces right side up. OR, alternatively, you can trace your template pieces onto a single layer of red fabric right side up.
- Grain line is important. As you trace the template, keep the long, marked grain line edge of the template piece along either the crosswise or lengthwise grain of the fabric. This will keep the finished blue and red unit from having an outer bias edge (which may stretch out of shape), and will make your piecing much easier.
Okay, now we're ready to go!
Step 5: Trace the template onto your red fabric. You will need to trace it 64 times if tracing on a single layer of fabric, or 32 times if tracing on a double layer.
.JPG) I used a white tracing pencil, but you could use a washable fabric marker, etc.
I used a white tracing pencil, but you could use a washable fabric marker, etc.
.JPG) Step 6: Cut out your red pieces as marked. You may want to use a scissors instead of a rotary cutter for this (I used both). A scissors will give you better control when cutting angles. You should have 64 identical red pieces. Again, it helps to stack all of these right side up to minimize confusion as you assemble them.
Step 6: Cut out your red pieces as marked. You may want to use a scissors instead of a rotary cutter for this (I used both). A scissors will give you better control when cutting angles. You should have 64 identical red pieces. Again, it helps to stack all of these right side up to minimize confusion as you assemble them.
 Step 7: Place a red piece onto a blue subunit as shown, right sides together. The important area to match is the lower edge. When done correctly, you will see a little blue triangle at the lower edge where the two pieces are slightly offset. The upper edge of the red fabric will extend beyond the upper point of the blue subunit. This is OKAY and as it should be. It will be trimmed later (don't trim now).
 Sew a 1/4-inch seam along edge.
TIP: Start sewing from the lower edge to the upper point, with the red piece on the bottom as you feed it through your machine. This is a bias edge, so be sure not to stretch it when sewing or pressing.


 Continue piecing all units together in this manner, for a total of 64 blue and red units.
Step 8: Press seam toward the red fabric on each unit. Use a dry iron setting, no steam.
I don't have a photo of a finished blue and red unit by itself, but you can get the idea below. Again, don't trim anything yet. We'll do that later when we trim these blocks to size.
 Next: Part 3 - Making the string units and sewing the blocks.
 Thank you all so much for your lovely comments on the Double Pinwheel String Quilt. I really appreciate your kindness and enthusiasm!
As promised, I am going to post a tutorial for this quilt in several parts, starting today. We'll get the technical stuff out of the way first, making the template for the inner red pinwheel. This is not hard, it just involves drawing lines and cutting. Simple, really.
First, a note about fabric. I'm going to talk about blue fabric and red fabric, because that's what I used, but you can choose your own color scheme, of course. I would recommend Kona cotton for the solid fabrics. As I have mentioned, Candy Blue and Rich Red were what I used. As far as yardage, I am going to estimate you will need about 2-2/3 yards of the blue and 4 yards of the red. What fabrics you use for the string-pieced pinwheels is totally up to you. I used scraps in my stash, cut into 1 or 1-1/2 inch strips, or "strings."
So, here we go!
Part 1 - Making the Template
Let's start by making the template for the narrow inner (red) pinwheel on this quilt. For this, you'll need to make a template out of lightweight cardboard or some other such material. You will be tracing your template onto your red fabric, as I'll explain in Part 2, so it needs to be sturdy enough to trace around multiple times. In this example, I am using cardstock, but you could use the inside of a cereal box, etc.
Step 1: Cut a piece of cardstock into an 8-1/2 inch square.

 Step 2: Mark a diagonal line from corner to corner. Cut along diagonal line.
 Step 3: Take one of the triangles you just cut and reposition it on the cutting mat so that the longest side of the triangle is at the bottom (toward you). This long side should measure 12 inches.
Then mark a point 3-1/8 inches from the right-hand corner on the lower edge of the triangle.
.JPG) Step 4: Using your ruler, draw a diagonal line from this mark to the top point of the triangle. Cut along line.
Step 4: Using your ruler, draw a diagonal line from this mark to the top point of the triangle. Cut along line.
.JPG)
 Step 5: Place the smaller triangular piece you just cut off the right side onto another piece of cardstock, and trace it. Important: Do not flip the piece over that you are tracing. I'm using a different color cardstock here, for illustration purposes, but you can use whatever you have.

.JPG) Step 6: Add 3/8 inch along the right (longest side) of the traced triangle. Draw this line.
Step 6: Add 3/8 inch along the right (longest side) of the traced triangle. Draw this line.
.JPG)
 Step 7: Mark grain line along the long edge. Trust me, it's important!
 Step 8: Cut out your cardboard template along the outermost lines you just drew.
.JPG) And there you have it--the only template you will need for this quilt! You can get rid of all your other cardboard pieces and scraps except for this one piece.
And there you have it--the only template you will need for this quilt! You can get rid of all your other cardboard pieces and scraps except for this one piece.
Next: Part 2 - Cutting and piecing the blue and red units.

 Heading for the finish line on the Double Pinwheel String Quilt!
 We will be making 16 large pinwheel blocks, each consisting of four of the block units that you made in Part 3.
 (Back of Block)
 Step 3: Cut sashing strips and outer border from your remaining 3 yards of red fabric as follows:
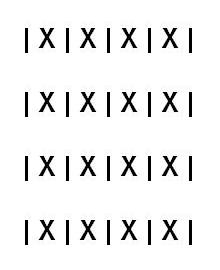 Press seams toward red sashing strips.
 Press seams toward red sashing strips.


.JPG)
.JPG)


.JPG)
.JPG)


.JPG)
.JPG)


.JPG)