Showing posts with label wall hangings. Show all posts

Sunday, December 27, 2020

Second Necktie Project Finished

Yesterday I finished necktie wall hanging number two.  


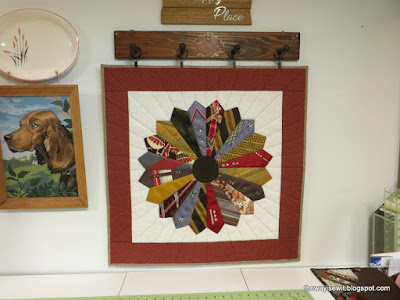
It was inspired by a wall hanging in my entryway that I was taking down a couple weeks ago to replace with a more holiday-themed decoration.  All that Pinterest browsing for necktie projects and the inspiration was literally dangling right in front of my nose!

I had made it from a kit I picked up somewhere in the early days of my quilting experience.  Luckily, I still had the instructions (and homemade templates).  It's dated 2003, so I must have made the original kit wall hanging within a year or two of that.


I had set aside certain other ties to use for a second project while I was working on the first one.  The second project would use different blue and red ties, including the wild blue paisley and red swirly silk ties, which were my personal favorites.


First was to stabilize the fabrics with interfacing, using the Bi-Stretch Lite again.  I have to say the more I worked with it, the more I appreciated this particular interfacing.  It worked especially well on the finicky silks, as well as the poly, acetate, and rayon blends.


Then it was just a matter of cutting everything out.  I had to be judicious about cutting the pieces so as to get the right number from the limited amount of fabric available in a necktie.  

I played around with the layout a while, changed a few things around, and then sewed up the nine blocks.  As far as sashing fabric, I'm really trying to stay out of the stores and heed that little voice in my head that says, "Use what you have."  I auditioned batiks...oh, no.  Black fabric played up the drama, but seemed a little too depressing.  Kept coming back to this silvery gray.  I think it has enough variation in the gray to complement the shimmer of the tie fabrics.  Is it perfect?  No, but good enough.


These pictures are reading more of a pea soup green color in the lower corners of the blocks than they appear in real life.  They're more of a gold, or maybe olive gold color. 


For the quilting, I experimented on a sample with a meander and some other designs, but it reminded me of a quilted bathrobe in texture, and that's not the look or feel I wanted.  So once again, simple straight lines won out.  


I toyed with the idea of sewing a small decorative button in the center of the "tulip" in the gold squares, but then I thought about tie tacks (pins).  If my friend has any of those from her late husband and wants to embellish it, she can give that a try.


This time I had a plan for some of the labels on the back.  I arranged them on the hanging sleeve before I sewed that on the back and stitched them down by machine.

All in all, I'm happy with how it turned out.  I'm not sure if there is another project in me to use the leftovers, but for now I think I'll take a break and do something else for a while.


Saturday, December 19, 2020

Necktie Wall Hanging

Mission accomplished!  The wall hanging from neckties that I was aiming to finish for my friend by Christmas is now done.  I put the final stitches in the binding yesterday.


Then I had the afterthought to hand sew some of the labels I'd taken off the ties onto the back of the quilt.  Many of these ties were from the same local clothing store (which closed some 50 years ago) and of the same brand.  It was neat to see how the brand label had changed through the years, along with the style of tie.


Other than stitching the inner and outer edges of the Dresden to the backing fabric, I relied on the way I was going to quilt it to further secure all the layers together.  I started in the open center circle, stitching in the ditch of each of the blades of the Dresden in straight lines radiating outward, and continuing through the background and into the border.  Like rays, I guess.

(Using painter's tape as a guide.)


I used a variegated Sulky thread in shades of gold, red, and dark brown to echo the shimmer of the ties.  Hard to tell on these pictures, but I like that it's not just a flat-looking thread.  The bobbin thread was Aurifil, and I also used that to ditch quilt the square where the background and border meet.


Finally, I added the center brown circle from the only wool tie in the group.  I had to maneuver around a few holes and thin spots, but found an area of viable fabric to cut the circle from.


Third time's a charm when it came to free-motion quilting that center spiral.  I even drew it in chalk first.  Sheesh!


Normally I don't add a rod pocket to my wall hangings because I use curtain rings to hang them at home, but I added a pocket on this one to keep things easy for the recipient.

Here, in this picture below where I used flash, you get a better sense of the texture of these ties.  They're really smooth, shiny, and silky feeling!


Can you tell the gentleman was an avid outdoorsman?  I love those pheasant and grouse ties (at about the 12:30 and 4:30 positions).  Also, the geometric mid-century graphics on several of the other ones.  And that Greek key.  Okay, I love them all!


I'm going to take a stab at another wall hanging from a different grouping of ties I've set aside, now that I have the hang of this a bit.

Wednesday, June 13, 2018

It's the Little Things

This is absolutely my favorite time of year.  I just came back from a walk and the sky was such a clear blue, the trees and lawns so lushly green, new flowers vivid and bright, the air light and breezy.  What's not to love?
(View from the bike trail a couple weeks ago.)
(Another bike trail view.)
Pollen, I suppose.  Mosquitoes, depending on the time of day.  There are those too, but the good things far outweigh the nuisances most days.

I have been posting regularly on Facebook (mostly family in that group), but I need to catch up a bit here on the blog.  
(Purple martins enjoying the evening.)
Sewing-wise, I've finished up a couple small things in the past few weeks.  These star pillows, from Dad's shirts and ties, got backs made and were stuffed.
I used a denim shirt of Dad's for the back of one.  He was a big man, so his size XXL shirt back was just right for an 18-1/2 inch, envelope style pillow back.  For the other pillow back, I just used a medium brown Kona cotton.
My niece got married last September and my Dad was able to attend the wedding.  She posted a picture on Facebook recently where I noticed Dad was wearing the blue shirt I'd used in the pillows, so I gave her one of them as a keepsake.
I also picked up the memory quilt from Betty, the longarm quilter.  She did a great job with an overall design.
(Memory quilt from Dad's shirts.)
I bound the quilt in the same brown Kona as mentioned above for the pillow back.

As I was tidying up the sewing space recently, I came upon a small pile of bonus half-square triangles.  I thought I'd given the whole lot of these to a friend to whom I'd recently sent a box of orphan blocks.  Yet here were some stragglers that got left behind.
Well, you know how it goes when you start playing with scraps.  Pretty soon I had them laid out, then sewn together, then bordered, etc.  And then I thought it needed buttons, just because.
I call this a procrastination project.  Had other things I probably should have been doing, but following this little bunny trail seemed more compelling.  

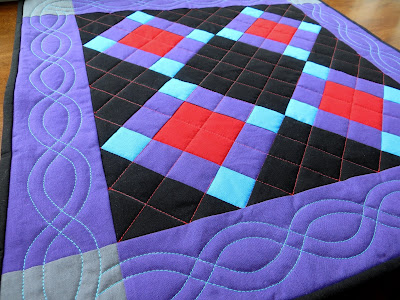
Another thing I found while putting things away was an Amish doll quilt flimsy I'd pieced well over 15 years ago.

(Found Amish doll quilt flimsy)
I'd stuffed it way back in a drawer.  I remember being somewhat disappointed in the fact that I'd had to piece the border in two places because the scrap of purple fabric I was using wasn't quite long enough.  And I didn't want to buy more fabric just to finish a silly little doll quilt.  

It makes me chuckle now, remembering that I was bummed about the minor details of having a couple extra seams in a border.  Since then, I've pieced together a lot of borders and know it doesn't matter much at all in the scheme of things.

I also remember getting to the "now what?" point after it was a flimsy.  I didn't have any free-motion quilting skills yet, and the thought of hand quilting felt like too much effort.  So it was put away.

After rediscovering it recently, I decided it deserved finishing.  And so I did.
I used a walking foot and cross-hatched the center part in red thread.  Then I used an older plastic template I had to chalk on an outline for the wavy braid-like border.  I used a vintage turquoise thread from the 1970s called "Super Sheen" (thrifted!) to quilt the border, again with the walking foot.
Interestingly, I had bought that template for an Amish quilter to use many years ago.  She hand-quilted a Smoky Mountain Stars quilt for me and used the same quilting design in the border.

Next in line (maybe) is to finish quilting a String-X quilt that's been basted and waiting for a few weeks already.  It might be aged just enough to start—unless I find another procrastination project in the meantime.   
And did I mention it's my favorite time of year?  There are trails to hike or bike, roses to smell, sunsets to watch...

Monday, October 31, 2016

Quilty 365 Progress

This month's Quilty 365 circles are brought to you by the color orange, or what may pass for orange, anyway.  I had to stretch the boundaries a bit to align with the stash, so we have everything from rusty brown to peach, with a twist of gold to boot.
What makes me smile in particular today is the one below, made with one skinny string's worth of skeletons on orange background fabric, plus a stripey narrow string of something else between.  Happy Halloween!
Here is the whole month's worth of orange October blocks.
I missed last month's link up because we were on vacation, but here, too, is the August/September lot of yellow and tan circles.  I made 33 blocks for those two months combined, plus 31 in October, making the total for this project 277 so far.
Now, I'm kind of stumped on November.  In the beginning of the year, I scribbled down color themes for each month, but November was "vintage fabrics?" and December was "holiday fabrics?".  Note the question marks.  I was moving away from the color theme of the month and into the realm of other possibilities when I jotted down those ideas.  

Right now, I'm thinking November may be a free-for-all.  I don't have 30 different vintage fabrics, I know that for sure (and besides, I've used a few vintage fabrics in blocks already; see the orange/teal/black scribble block in the October group above, for example).  So we'll see what happens.


I also finished the quilt top from the Aspen Frost layer cake. It's ready for pin basting and quilting one of these fine days when I feel like moving the kitchen furniture out of the way and mopping the floor.
And I don't think I've mentioned yet the Friendship Circle I had put together before we left on vacation a month ago.  I used the half-square triangles of made-fabric trimmed from the Quilt for Pulse.  When this is finished, it'll be wall hanging size(Also, you won't see the gingham check showing through.  That's my design wall covering, the fuzzy back side of a gingham check vinyl tablecloth fabric.)

Did you have many trick-or-treaters at your house?  We only had a handful this year.  Maybe the fact that trick-or-treat hours yesterday were during the Packer game had something to do with it.

Linking to:  Quilty Folk

Wednesday, June 1, 2016

Crafted Applique Blog Hop and Giveaway

Hello all!  I'm excited to be part of the blog hop today for Lara Buccella's new book, "Crafted Applique...New Possibilities."

Lara blogs at BuzzinBumble, and we met via the comments section of our blogs a couple years ago and became friends. She is a genuinely sweet, kind person, and I was honored when she asked me if I would review her book and be part of her book tour blog hop.  

I'm also happy to be able to give away a copy of the Crafted Applique book to one lucky person, so keep reading and leave a comment below for your chance to win!

Applique is something with which I have some experience on a small scale— mostly wall hangings and such—with mixed results.  I've done a bit of needle-turn applique and a few projects using fusibles.  I got a little fed up with fusibles at one point and tried some raw edge applique by just pinning things in place and edge-stitching.  A bit tricky, as you might imagine, and I dread it fraying or coming apart in the wash.  So I was really interested in learning about a new and different technique in Crafted Applique.  

Makes fabric fusible yet flexible?  Non-fraying even after washing, and won't gum up your needle?  Okay, I'm in!

There are some absolutely gorgeous projects in Lara's book.  The one featured on the book cover is my favorite!  The really cool thing is that once you know how it's done, the sky's the limit, and I predict you'll be off and running with your own ideas in no time!  Gotta love a book that not only has wonderful step-by-step instructions and projects but inspires and enables you to create your own right off the bat.

Let's try some simple shapes, for starters, I thought.  I'm often inspired by nature, and this year we've got an interesting thing happening in our backyard—some crows have decided to nest in the tall ash tree next to the deck.  They've been fascinating to watch!  I say "they" because crows are very social and cooperative birds, and taking care of the nest, and the crow mama sitting on it, is a family affair.


So with our resident crows in mind, I found a silhouette to use as a pattern for this mini-quilt, which finished at 10.5 inches square.

I love how it turned out!  It was very easy to prep the fabric, cut out the shape, adhere, edge-stitch, and quilt.  And it's reassuring to know that the sharp details of the feathers and beak won't fray.
 
For my next project, staying with the simple shapes theme, I thought about the effigy mounds that populate the landscape here in southern Wisconsin. Effigy mounds are large raised piles of earth stylized in the shapes of animals, symbols, or other figures.  

The mounds in this area were constructed by an ancient Native American culture known as the Late Woodland, or Effigy Mound Builders, between 800 AD and 1200 AD, likely the pre-Columbian ancestors of the Ho-Chunk Nation.
  
"It is believed that most effigy mounds fall into three classes corresponding to the three natural realms - air, earth and water. The cosmology of many Midwest Native American tribes consider these realms in terms of the upper world (air) and lower world (earth and water). Some of the prominent shapes in this particular grouping include turtles, panthers, canines, buffalo (bear), deer and birds. Long-tailed effigies, such as turtle and panther mounds are believed to be representations of powerful (lower world) water spirit-beings. Often times they are oriented toward a spring or water source."  (Source) 
Represented in my wall hanging is a bird effigy, top left, and then clockwise from there is a fox effigy, turtle effigy, and buffalo effigy.  The wall hanging measures 25.5 inches square.


I quilted this piece in a multicolored thread in a spiral pattern, leaving the appliqued shapes unquilted (thus more mound-like).
Of course in real life, effigy mounds are not as easy to see as a bright batik fabric.  You could walk by or around or over them and not notice unless it was pointed out.  In fact, the back of the piece more accurately represents how they tend to blend into the landscape. Thankfully, many effigy mounds or mound groupings have been preserved and marked, although innumerable sites were destroyed in the early days of agriculture and housing and industrial development.  

I've really enjoyed reading and working with "Crafted Applique: New Possibilities" as a guide and inspiration.  I can't wait to see what YOU will do! 


* * * * Giveaway! * * * *

What might you want to do for your next applique project?  What have you enjoyed or been challenged by in your experiences with applique?

Leave a comment on this blog post for a chance to win a copy of the book, "Crafted Applique...New Possibilities"!   I will draw a winner from the comments on Monday, June 6, at noon Central Time.  Please be sure you are not a no-reply blogger, or leave your email address in your comment if you're not sure, so I can contact you if you win!

Thanks for visiting - and good luck!

And please explore any or all of the blog hop stops to see the way others have been inspired by Crafted Applique.  Here's the schedule:

Crafted Appliqué: New Possibilities Blog Hop - May 1st to June 5th

Sunday, May 1 - Introduce the Hop and post the schedule on BuzzinBumble
Monday, May 2 - Valerie Smith - Pumpkin Patch Quilter
Tuesday, May 3 - Dana Gaffney - Stormy Days
Wednesday, May 4 - Lorna McMahon - Sew Fresh Quilts 
Thursday, May 5 - Mary S. - Needled Mom
Friday, May 6 - Heidi Kuntz - Red Letter Quilts
Saturday, May 7 - Alycia Carmin - Alycia Quilts
Sunday, May 8 - Amy DeCesare - Amy Made That
Monday, May 9 - Sherri McConnell - A Quilting Life
Tuesday, May 10 - Lara Buccella - Sew Mama Sew 
Wednesday, May 11 - Christina Cameli - A Few Scraps
Thursday, May 12 - Melissa Corry -  Happy Quilting
Friday, May 13 - Sarah Craig - Confessions of a Fabric Addict
Saturday, May 14 - Soma Acharya - Whims and Fancies 
Sunday, May 15 - Val Reynolds -  Val's Quilting Studio
Monday, May 16 - Angela Pingel - Cut to Pieces
Tuesday, May 17 - Sandra Walker - Musings of a Menopausal Melon
Wednesday, May 18 - Cheryl Brickey - Meadow Mist Designs
Thursday, May 19 - Judy Murphy - Quilt Paradigm
Friday, May 20 - Yvonne Fuchs - Quilting Jetgirl
Saturday, May 21 - Cindy Pieters - Stitchin' at Home
Sunday, May 22 - Susie Zlogar - Susie's Sunroom
Monday, May 23 - Connie Kresin-Campbell - Freemotion by the River
Tuesday, May 24 - Ruth Bourke - Charly & Ben's Crafty Corner
Wednesday, May 25 - Kaja Zieslar - Sew Slowly
Thursday, May 26 - Ann Brooks - Fret Not Yourself
Friday, May 27 - Cynthia Brunz - Quilting is More Fun Than Housework
Saturday, May 28 - Monday, May 30 ... Memorial Day Weekend in the U.S.
Tuesday, May 31 - Jenn Trott-Zisserson - Quarter Inch From the Edge
Wednesday, June 1 - Paulette Horn - The Way I Sew It
Thursday, June 2 - Sandra Jansen - Studio Sew of Course
Friday, June 3 - Christine Sherman - Triangles and Squares
Saturday, June 4 - Darlene Simmons - Quilt Shop Gal
Sunday, June 5 - Announce BuzzinBumble Giveaway Winners - Lara Buccella

Sunday, February 28, 2016

Sunday Sundry 2-28-16

This little wall hanging is now quilted and bound and hanging on the sewing room wall.  I may not have gotten it done by Valentine's Day, which was an arbitrary deadline, but a couple weeks later is fine by me.

As usual, what stalled me was how to quilt it.  I finally began with some circles or pebbles in the red sashing and curlicues in the black and white inner borders, then went back and did straight line ditch quilting in the whirligigs and a meander in the outer border.

(Quilting as seen from the back)
You know what I have a problem with?  Quilting exactly over the same line or curve.  I can do it, sort of, but I really want to wander.

I don't know if it's a lack of attention, some kind of neurological thing that makes me a little shaky, a contrariness about following rules, or a general reluctance to go over the same ground I've already covered. 

(I don't always overthink things, but when I do...)

Anyway, the struggle is real.

But what ultimately went through my mind was remembering to just "embrace the shake."  If you've seen this TED talk by artist Phil Hansen, you know what I mean.  If not, it's definitely worth a few minutes to watch it.  It's about working creatively within your limitations.  Limitations in function, limitations in resources can inspire an abundantly creative life.  I love that kind of thing.

And that also relates back to this wall hanging, because it started with a baggie of scrap pieces.  

There was only a certain number of dark red pieces with which to make the whirligig blocks, and then there were some red and white print pieces.  Those lighter bits made three whirligigs that recede into the background.  You have to look at little bit harder to see them, but they're there.


* * * * *
The Joy in the Evening quilt has been donated to an upcoming local fundraiser for Badger Honor Flight.  The Honor Flight Network flies WWII and terminally ill veterans to Washington, D.C. to see the memorials erected in their honor. 

I wish my father-in-law would have been able to participate in an Honor Flight, but he passed away a few years before the program was begun.

At any rate, it makes me happy to be able to participate in a very small way so that another veteran can be part of an Honor Flight experience.

* * * * *
I've had a cruddy cold this past week, which zapped my energy.  Things are starting to feel more normal again, finally.  My voice still sounds pretty ragged and gravelly, but it's getting better.

My face is healing too.

PSA:  A few days into a cruddy cold with frequent nose-wiping and blowing is NOT the day to decide to Nair your upper lip.

I'm just sayin'.

* * * * *
So let's talk about food, specifically, cookies.  More specifically, using a mashed avocado in cookies.

An avocado?  Oh yes!  The mushy green fruit of a mashed avocado makes these cookies delightfully delish.  Well, that and the chocolate.  This is one of the keepers in my recent experiments in gluten-free baking.

Now if you like a crunchy cookie, this is not the droid you are looking for.  But if you crave a cakier morsel with a tender chocolatey crumb, then read on, my friend.

Chocolate Chip Avocado Cookies (Gluten-Free)

Blend together dry ingredients in a small bowl:

3/4 cup almond meal (almond flour)
1/4 cup coconut flour
2 Tablespoons cocoa powder (I use raw cacao powder)
1/4 teaspoon xanthan gum
1/8 teaspoon cinnamon (optional)
1 teaspoon baking soda
1/4 teaspoon salt

Whisk wet ingredients together in a mixing bowl:

One-half avocado, mashed
1 egg
1/4 cup melted coconut oil or melted butter (I used ghee)
1/2 cup real maple syrup
1 teaspoon vanilla

Add dry ingredients to wet ingredients and mix well.  Stir in 1/2 cup semi-sweet chocolate chips.

Preheat oven to 350 degrees.  Let the cookie dough sit while the oven preheats, or about 5-10 minutes.  This gives the dough time to absorb all of the moisture and become scooping consistency.  Then scoop by tablespoonfuls onto a cookie sheet, pressing down slightly if you want them more flat than fat (they don't spread much with baking).  Bake for 11 minutes.  Let cool on cookie sheet for about 5 minutes before removing to rack to continue cooling.

Enjoy!

* * * * *
Linking to:  Confessions of a Fabric Addict's Can I Get A Whoop Whoop!