This is the second part of a tutorial on making the Double Pinwheel String Quilt. Part 1 can be found here. There will be 4 parts (I think) in all.
Now that we have our template, we're ready to start making the blue and red units.
Let's start with the BLUE FABRIC:
You will need a total of approximately 2-2/3 yards of blue fabric for this quilt, including what we're cutting today and the blue border later on.
Step 1: Cut 32, 8-1/2 inch squares from blue fabric.
Step 2: Cut each square on the diagonal into 2 triangles. (Seem familiar? This is going to be just like Steps 2-4 of Part 1, except that we're cutting our blue fabric to proper size, and we're going to use the other part of the triangle.)
 Step 3: Take one of the blue fabric triangles you just cut and reposition it on the cutting mat so that the longest side of the triangle is at the bottom (toward you). This long side should measure 12 inches.
 Mark a point 3-1/8 inches from the right-hand corner on the lower edge of the triangle.
 Step 4: Position your ruler from this mark you just made, to the top point of triangle (Point A to Point B in photo). Cut along this diagonal line.


This time, we will only be using the larger portion on the left as our blue subunit. The small triangular pieces you cut off from the right side can be discarded or saved as scraps for another project.
 Repeat this for all blue squares, cutting each square into 2 triangles, then trimming each triangle as above into a subunit. You will end up with 64 blue subunits.
TIP: Arrange all your blue squares right side up before cutting diagonally into triangles; also keep all your trimmed blue subunits right side up and oriented in the same direction, i.e., just as you trimmed them. It's easy (at least for me) to get confused if you start flipping pieces over.
From the RED FABRIC:
You will need a total of about 4 yards of red fabric for this quilt. Tracing the template for the inner pinwheels will require about 1 yard; the remaining 3 yards will be used for sashing and borders.
We are going to trace the template (made in Part 1) onto red fabric. However, there are a few KEY THINGS TO KNOW BEFORE PROCEEDING:
- Do not flip your template piece over when you trace. All red pieces are traced with the same side of the template facing up--the side that you marked with the grain line in Part 1. You may want to write "This Side Up" on your template to remember not to turn it over to the other side when you trace it. If you do flip it, your red piece won't fit your blue piece when it's time to sew them together.
- Red fabric should be traced with right side of fabric up. If you normally cut your fabric doubled with the fold along the edge, you will need to cut along the fold of 1 yard of the red fabric and stack both pieces right side up. OR, alternatively, you can trace your template pieces onto a single layer of red fabric right side up.
- Grain line is important. As you trace the template, keep the long, marked grain line edge of the template piece along either the crosswise or lengthwise grain of the fabric. This will keep the finished blue and red unit from having an outer bias edge (which may stretch out of shape), and will make your piecing much easier.
Okay, now we're ready to go!
Step 5: Trace the template onto your red fabric. You will need to trace it 64 times if tracing on a single layer of fabric, or 32 times if tracing on a double layer.
.JPG) I used a white tracing pencil, but you could use a washable fabric marker, etc.
I used a white tracing pencil, but you could use a washable fabric marker, etc.
.JPG) Step 6: Cut out your red pieces as marked. You may want to use a scissors instead of a rotary cutter for this (I used both). A scissors will give you better control when cutting angles. You should have 64 identical red pieces. Again, it helps to stack all of these right side up to minimize confusion as you assemble them.
Step 6: Cut out your red pieces as marked. You may want to use a scissors instead of a rotary cutter for this (I used both). A scissors will give you better control when cutting angles. You should have 64 identical red pieces. Again, it helps to stack all of these right side up to minimize confusion as you assemble them.
 Step 7: Place a red piece onto a blue subunit as shown, right sides together. The important area to match is the lower edge. When done correctly, you will see a little blue triangle at the lower edge where the two pieces are slightly offset. The upper edge of the red fabric will extend beyond the upper point of the blue subunit. This is OKAY and as it should be. It will be trimmed later (don't trim now).
 Sew a 1/4-inch seam along edge.
TIP: Start sewing from the lower edge to the upper point, with the red piece on the bottom as you feed it through your machine. This is a bias edge, so be sure not to stretch it when sewing or pressing.


 Continue piecing all units together in this manner, for a total of 64 blue and red units.
Step 8: Press seam toward the red fabric on each unit. Use a dry iron setting, no steam.
I don't have a photo of a finished blue and red unit by itself, but you can get the idea below. Again, don't trim anything yet. We'll do that later when we trim these blocks to size.
 Next: Part 3 - Making the string units and sewing the blocks.
 Thank you all so much for your lovely comments on the Double Pinwheel String Quilt. I really appreciate your kindness and enthusiasm!
As promised, I am going to post a tutorial for this quilt in several parts, starting today. We'll get the technical stuff out of the way first, making the template for the inner red pinwheel. This is not hard, it just involves drawing lines and cutting. Simple, really.
First, a note about fabric. I'm going to talk about blue fabric and red fabric, because that's what I used, but you can choose your own color scheme, of course. I would recommend Kona cotton for the solid fabrics. As I have mentioned, Candy Blue and Rich Red were what I used. As far as yardage, I am going to estimate you will need about 2-2/3 yards of the blue and 4 yards of the red. What fabrics you use for the string-pieced pinwheels is totally up to you. I used scraps in my stash, cut into 1 or 1-1/2 inch strips, or "strings."
So, here we go!
Part 1 - Making the Template
Let's start by making the template for the narrow inner (red) pinwheel on this quilt. For this, you'll need to make a template out of lightweight cardboard or some other such material. You will be tracing your template onto your red fabric, as I'll explain in Part 2, so it needs to be sturdy enough to trace around multiple times. In this example, I am using cardstock, but you could use the inside of a cereal box, etc.
Step 1: Cut a piece of cardstock into an 8-1/2 inch square.

 Step 2: Mark a diagonal line from corner to corner. Cut along diagonal line.
 Step 3: Take one of the triangles you just cut and reposition it on the cutting mat so that the longest side of the triangle is at the bottom (toward you). This long side should measure 12 inches.
Then mark a point 3-1/8 inches from the right-hand corner on the lower edge of the triangle.
.JPG) Step 4: Using your ruler, draw a diagonal line from this mark to the top point of the triangle. Cut along line.
Step 4: Using your ruler, draw a diagonal line from this mark to the top point of the triangle. Cut along line.
.JPG)
 Step 5: Place the smaller triangular piece you just cut off the right side onto another piece of cardstock, and trace it. Important: Do not flip the piece over that you are tracing. I'm using a different color cardstock here, for illustration purposes, but you can use whatever you have.

.JPG) Step 6: Add 3/8 inch along the right (longest side) of the traced triangle. Draw this line.
Step 6: Add 3/8 inch along the right (longest side) of the traced triangle. Draw this line.
.JPG)
 Step 7: Mark grain line along the long edge. Trust me, it's important!
 Step 8: Cut out your cardboard template along the outermost lines you just drew.
.JPG) And there you have it--the only template you will need for this quilt! You can get rid of all your other cardboard pieces and scraps except for this one piece.
And there you have it--the only template you will need for this quilt! You can get rid of all your other cardboard pieces and scraps except for this one piece.
Next: Part 2 - Cutting and piecing the blue and red units.
 I finished the double pinwheel string quilt top this week!
Writing that sentence reminds me of the scene in the movie The Jerk when Steve Martin exclaims, "The new phone book is here! The new phone book is here!" Speaking of which, I could use a new phone book, seeing as I ripped out 32 pages of mine for this string quilt.

But I do feel kind of giddy that it's done. And while it would be inappropriate for me to run down the block making silly proclamations about what some would consider mundane, I am comfortable doing so here among my fellow quilters and sewers in the virtual neighborhood. I will also be participating in my first Sew & Tell Friday ~ Welcome, friends! Can't wait to see what has each one of you excited about accomplishing this week.
 I wrote about beginning this quilt and the inspiration for it here. All in all, it was an enjoyable challenge to come up with a pattern based on a photo of a quilt I admired, especially since everything seemed to work out in the end. Creating the template for the inner (red) pinwheel was a bit tricky. I made no less than three different versions of it before I settled on one that was good enough and quit racking my brain. At the end of the day, it's a quilt, not a geometry quiz. Besides, that's what rotary cutters are for, right? If at first you don't succeed, trim to size!
 A tutorial for this quilt, starting with "Part 1-Making the Template," goes up next week. This will be followed by "Part 2-Throw Away Part 1 and Make Another Template." Nah, just kidding about that last bit. It's easy, really. I just thought about it way too much. Hopefully, you won't have to.
Edited to add: Here are the links to the tutorial for this quilt: Part 1, Part 2, Part 3, and Part 4. You can also click Tutorial link from the labels list on the sidebar.
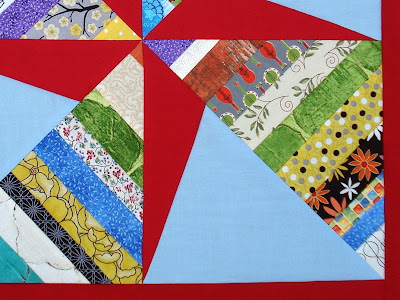
The string piecing for the outer pinwheels was done on phone book yellow pages cut to 8.5 inches square and pieced on the diagonal, then cut in half on the opposite diagonal. The paper was removed later, of course. For the strings, I used 1 to 1.5 inch fabric strips, from modern to vintage and all points between. I made mine as a scrap-buster quilt, but I think it would also look nice in a specific theme, line of fabric, or color scheme for the strings. It seems very versatile.
 I used a thrifted, solid blue, vintage fabric for the blocks and a red from stash, but ran out of both and had to buy additional fabric for the borders and sashing. Thankfully, Kona "Candy Blue" and "Rich Red" were an almost perfect match.
 This will finish at about 80 inches square. It'll be vacationing at the longarm quilter's for a couple months, then I'll bind it when it comes home from there, all gussied up (the quilt; I don't get gussied up to do binding, though I might throw on a bit of Chap Stick).

I found a cute dotted/striped fabric for the binding. That should give it a fun bit of pop along the edge, hopefully without looking too much like the circus came to town.
 Thanks for stopping by, and be sure to visit amylouwho and all the participants in Sew & Tell Friday!
 I started my fourth quilt right after finishing the Streak of Sunshine baby quilt in the fall of 2007. It was inspired by a quilt I'd seen on Craftster, which grabbed my attention because the quilt maker had mixed in some cool vintage fabric from her grandmother. I happened to have some vintage fabric languishing in the stash since I'd bought a box of scraps at a yard sale many years before. Never quite knew what to do with it until I saw that quilt on Craftster. Ding, ding, ding! It was a winner of an idea!
The inspiration quilt had an interesting layout with what looked like a rail fence-type block with a larger center section sandwiched between two narrower strips. There was no tutorial but it looked totally doable without a pattern. I studied the photos and came up with a plan for block dimensions and size. I also wanted to replicate the inspiration quilt in its use of multiple fabrics, not just the usual three or four in a traditional rail fence quilt. I bought a couple additional fabrics that complemented the colors in the vintage pieces I wanted to use. Then away I went!
 Once the blocks were done, I fiddled with the layout a bit. With Norm's help--he has a good eye--we finally had one that seemed to work.
 Can you tell which fabrics are vintage?
 If you guessed the two with gray backgrounds, you would be right. I just loved the green and red guitars and banjos on the one, and the squiggly white squares on the other. I would estimate they're late '50s or early '60s prints. I have used bits of these vintage prints in several other scrap quilts since this one, including the current double pinwheel string quilt.
 The machine quilting was done by Sandy. This time, I gladly took my place in her usual work queue, no cutting in line.
 I asked for something simple and curvy to balance the overall angularity of the quilt. She did a nice job.
 My daughter really liked the look of this quilt as I was piecing it, so when it was finished, I gave it to her for her birthday!


 Step 3: Take one of the blue fabric triangles you just cut and reposition it on the cutting mat so that the longest side of the triangle is at the bottom (toward you). This long side should measure 12 inches.
 Mark a point 3-1/8 inches from the right-hand corner on the lower edge of the triangle.
 Step 4: Position your ruler from this mark you just made, to the top point of triangle (Point A to Point B in photo). Cut along this diagonal line.

 Repeat this for all blue squares, cutting each square into 2 triangles, then trimming each triangle as above into a subunit. You will end up with 64 blue subunits.
.JPG) I used a white tracing pencil, but you could use a washable fabric marker, etc.
I used a white tracing pencil, but you could use a washable fabric marker, etc..JPG) Step 6: Cut out your red pieces as marked. You may want to use a scissors instead of a rotary cutter for this (I used both). A scissors will give you better control when cutting angles. You should have 64 identical red pieces. Again, it helps to stack all of these right side up to minimize confusion as you assemble them.
Step 6: Cut out your red pieces as marked. You may want to use a scissors instead of a rotary cutter for this (I used both). A scissors will give you better control when cutting angles. You should have 64 identical red pieces. Again, it helps to stack all of these right side up to minimize confusion as you assemble them. Step 7: Place a red piece onto a blue subunit as shown, right sides together. The important area to match is the lower edge. When done correctly, you will see a little blue triangle at the lower edge where the two pieces are slightly offset. The upper edge of the red fabric will extend beyond the upper point of the blue subunit. This is OKAY and as it should be. It will be trimmed later (don't trim now).
 Sew a 1/4-inch seam along edge.

 Continue piecing all units together in this manner, for a total of 64 blue and red units.
 Next: Part 3 - Making the string units and sewing the blocks.


.JPG)
.JPG)


.JPG)
.JPG)


.JPG)


