Saturday, June 8, 2013

Intermission and a Whoop!

We're halfway through the Four-Lily block tutorial, and I'm taking a brief intermission to stretch my legs and rest my eyeballs.

Last night, I finished the block I've been making for the tutorial and taking pictures of along the way.  It turned out nicely! 

If you'd like to try this Four-Lily block yourself, see Part 1 and Part 2 of the tutorial, back a couple of posts.  The templates are available for free download for a limited time (details and link in Part 1).

Whoop-Whooping with Sarah today!


Thursday, June 6, 2013

Four-Lily Block Tutorial - Part 2

Today in Part 2, we'll sew together what I refer to as the four Corner Units of this block, made from joining pieces Pieces A, D, and E.  I'll show you some techniques for sewing the curves, which I hope you will find helpful.

Let me say here that if you are comfortable using a different technique for sewing curves and it has worked for you, go for it!  Some people don't like to mark or pin and have found ways to sew curves like these without it.  I have tried some of those methods and they didn't work as well for me.  So I'm going to stick with what I know, much of it from having sewn clothing through the years, and describe how I went about it.  Here we go!

First, we're going to sew Piece D onto Piece E.  Once that's done, we'll sew Piece A onto that.  To make aligning the curved edges easier, we'll mark them like this.

Fold the pieces in half and finger-press at the folded edge.  You don't have to crease the entire piece in half, just finger-press a tiny crease right at the edge that you're going to join to its counterpart.
Now fold it in half again and do the same, finger-pressing a crease at the folded edge.
When you open up your pieces, you'll see those little creases, which will be your registration marks for matching one piece to another.
Now unless you match up those creases immediately, they tend to relax and fade.  So I take my handy-dandy Frixion pen and just make a little hash mark at the creases in the seam allowance.  It makes it so much easier to see and only takes a couple seconds.  Totally worth it in keeping frustration levels low.
Place the arc-shaped Piece D right sides together on top of the paddle-shaped Piece E, matching up the middle registration marks at the center.  It will look like a U-shape on top.

To remember to align all the curved pieces on top this way, I kept in mind the phrase, "Thinking of U."  Corny, maybe, but it helped.  You gotta do what you gotta do, folks.
Now match up the right and left sides of the pieces and pin.  Then match up the remaining two registration marks and pin there.  It may look weird, but this is totally going to work.
The key to sewing this curved edge is to take your time and keep the edges aligned.  As you come to a pin, remove it, check that your edges are aligned and smooth as they go under the presser foot and that you're not sewing a wrinkle.  Maintaining a scant 1/4-inch seam allowance helps ensure you don't get wrinkles.  (If only it were that easy for our skin!)
Here's another trick I used.  Since I don't have fingernails (which might help hold those edges together as they go under the presser foot), I use the flat edge of a seam ripper to hold them down and stay smooth.  I don't use it all the time, but just from time to time, as needed.  You're sewing fairly slowly (right?) so you aren't going to run over anything and break a needle.


Now having said all that, it may seem fiddly, but it's not really that complicated.  I'm pretty sure that after the first seam or two, you'll have the hang of it. 

Finger-press the seam allowance toward paddle-shaped Piece E.  If you want to press this with an iron, use a DRY iron (steam tends to make waviness on the curves).  Also, if you used a Frixion pen to make the registration marks, avoid ironing over the ones on the edge you haven't sewed yet, because they will disappear with heat.
Next, we're going to attach Piece A, the background fabric corner.  Same deal:  Put Piece A, right sides together, onto the D+E piece you just sewed, so the U-shaped part is on top.
Pin at center, then sides, then match and pin at the other registration marks.
Sew Piece A to D+E, keeping the edges aligned, removing pins as you go, and using a scant 1/4-inch seam allowance.

Press the seam allowances downward, toward Pieces D/E.  Make 3 more Corner Units in the same way, for a total of 4.

Finally, sew together two Corner Units with Piece F in the center.
This is what I'm calling the Center Unit of the block.  You only need one Center Unit.  We'll use the other two Corner Units in Part 3.

Next up, in Part 3, we will make the Lily Units.  Yes, there's a Y-seam (or 4), but it'll be painless, I promise!

Wednesday, June 5, 2013

Four-Lily Block Tutorial - Part 1

This is Part 1 of a tutorial for making the Four-Lily Block, inspired by a quilt made by my grandmother Lillian sometime around the late 1960s or early 1970s.

This tutorial will show you, step by step, how to make the Four-Lily Block.  Let's get started!

Four-Lily Block

This block consists of three fabrics: A background fabric (I used Kona Snow) and two other fabrics.  You'll want some contrast and variety between the other two fabrics (light/dark; larger scale print/smaller scale).  You don't need much fabric for one block; a quarter yard or fat quarter of each fabric will do.  The block measures 16-1/2 inches square, unfinished.

NOTE:  This tutorial was originally written in 2013 for block construction using cardstock templates traced onto fabric.  As of March 2023, custom acrylic templates are available from DMP Engraving.  The new templates make fast and easy rotary cutting possible for this block.  I encourage you to check them out!
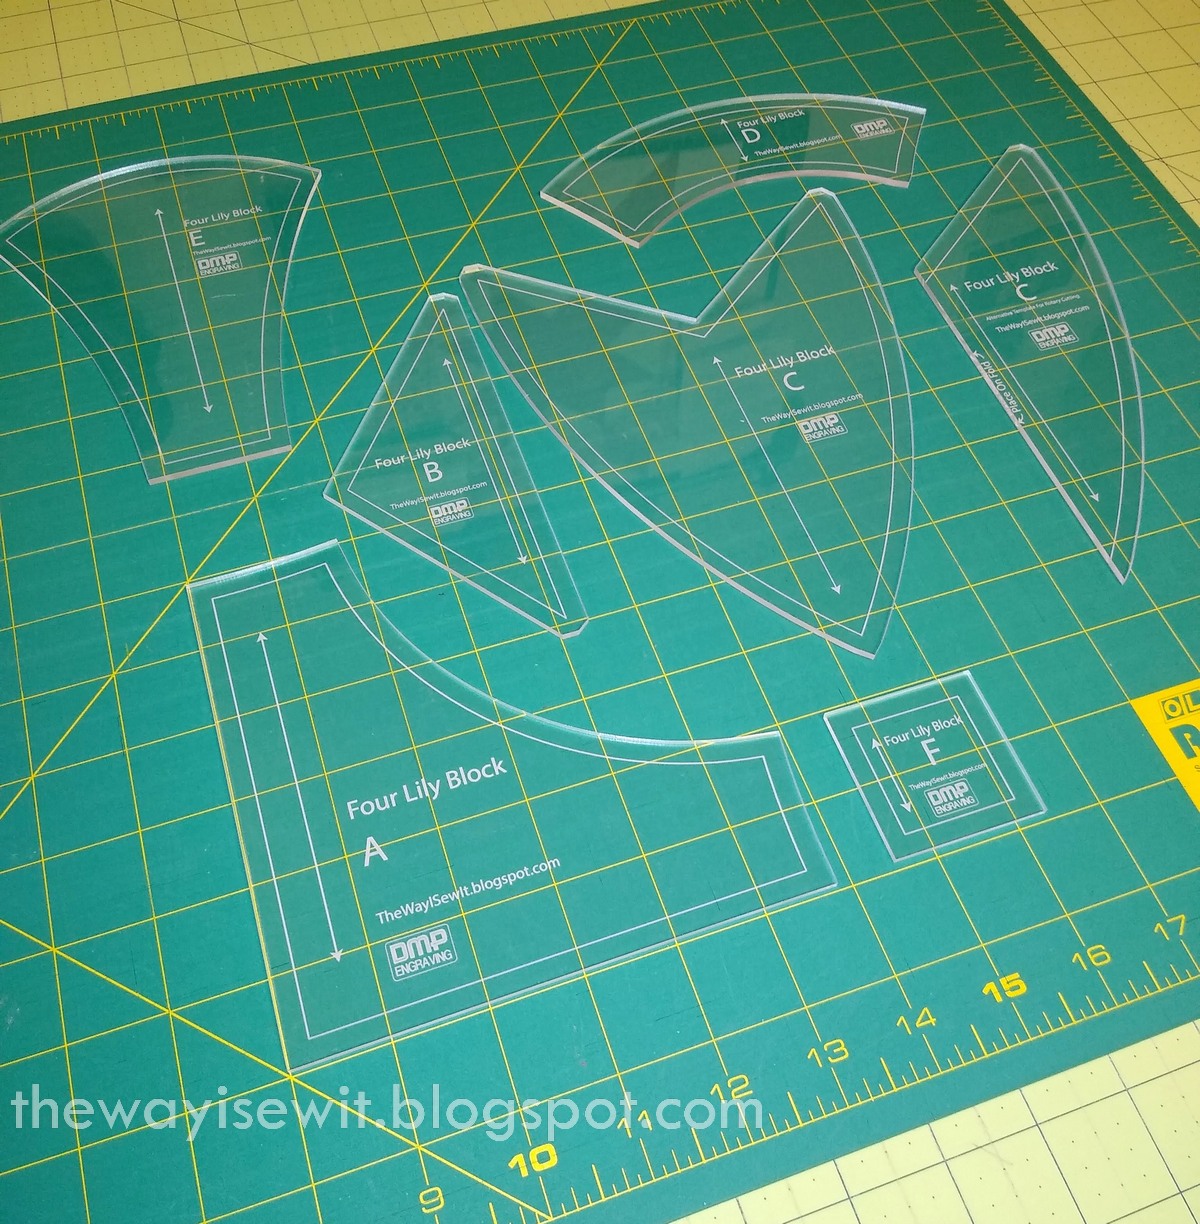

If you already have the acrylic templates, feel free to review Part 1 of the tutorial for general tips and then proceed to Parts 2, 3, and 4 for block construction, including helpful tips for curved piecing.

You can also download the free PDF Four-Lily Block Instructions HERE.

Original tutorial continues:

Print the template pages at 100% (no scaling/actual size).  Check for correct size after printing by measuring Piece F.  It should measure 1-7/8 inches square, including the seam allowances.  Cut out all six pieces along the outermost lines (the light gray lines), which includes the seam allowances.  Notice the way those light gray outer lines are shaped a little differently at the pointy ends of Pieces B and C.  Cut them as shown. Trace the paper pieces onto card stock and cut out your cardboard templates for Pieces A through F.

Press all your fabric.  Use spray starch, if you like (optional).

Next, we are going to trace the templates onto the fabric. But first, some things to note:

  • I used a Pilot Frixion pen for tracing onto fabric and also later when marking points used to match pieces before sewing.  The ball point marks smoothly and the lines are clearly visible.  With this type of pen, the ink disappears with heat, like that of an iron, so by the time you've pressed your block, the marks are gone.  I highly recommend the Frixion pen for this job, but feel free to use a different fabric marker, if you desire.

  • When I made the quilt and was cutting multiple pieces, I found it easiest to sub-cut the yardage into smaller width of fabric (WOF) strips and then trace the templates on those strips.  I've applied that method to making this one block as well.  If you're using a fat quarter, it will be just a little different, but the same principle applies, as explained below.

  • For example, for Pieces A and B, I cut an 8-1/2-inch WOF strip from the background fabric.  Keeping it folded selvage to selvage (double layer of fabric), I then traced Pieces A and B onto the background fabric.  If you're using fat quarters instead of yardage for this block, the same method applies, but you would fold your piece in half so it measures about 9 x 20 with the fold along the longer edge.  By tracing the pieces as shown, I could use my quilt ruler and standard rotary cutter to cut along some of the straight edges and cut the pieces apart.  Once the pieces are roughly separated, you can then use a scissors to cut out the remainder of the shapes. 
(Pieces A and B traced onto fabric - click to enlarge)
(Cut along straight edges to separate, then scissor cut)
  • When you are cutting your template pieces from a double layer of fabric, take care that the fabrics don't shift as you're cutting, especially when cutting curves.  You  may wish to pin along the edges of the pieces after you've rough-cut them apart from each other.  I did that at first, but then I found that if I just took my time and handled the pieces carefully, it wasn't a problem (and I didn't need to pin).
Okay, let's continue.  You will need a total of 4 of Piece A and 4 of Piece B from your background fabric.  Again, above is how I arranged those templates and traced them.  Since my fabric was doubled, tracing each piece twice yielded the 4 pieces needed for each A and B.

Next, you will need a total of 4 of Piece C and 4 of Piece D from your outer print fabric (the lily shaped pieces and the arcs that join them).  Here's how I traced those onto my fabric, along with Piece F.  You can see that I alternated the orientation of the pieces (up and down) for efficient use of the fabric.  If you're using fat quarters, you will probably need to trace Pieces D and F off to the side instead of above Piece C.
(Pieces C, D, and F traced onto fabric - click to enlarge)
(Alternating orientation of pieces)

The fabric is doubled, so tracing each piece twice yields the 4 pieces of each C and D needed.  You only need 1 Piece F square per block.

(Take care when cutting double fabric layers to prevent fabric shifting) 

The above photo shows where I've pinned along the edges on the uncut pieces on the right side (click to enlarge) to prevent the double layer of fabric shifting as the pieces are cut out.

Finally, you will need a total of 4 of Piece E from your inner print fabric.  Here's how I traced that:

(Piece E traced onto fabric - alternating orientation)
You'll see that I utilized the straight upper and lower edges as I alternated placement of Piece E (one less edge to trace/cut).  Again, the doubled fabric yields 4 pieces.

That's it - the cutting part is over!  You have all the pieces you need to make a block.

Next in Part 2:  Sewing together the four Corner Units.  (Hint: We'll be "Thinking of U!")

Getting Started

Sometimes getting started is the hard part.  Once you get going, there is a flow that carries you along, or at least that's what you hope for.

I am working on a tutorial this week for my Four-Lily block.  It's a different kind of W.I.P., but just as interesting and engrossing.


Four-Lily Block
The hard part was picking fabrics for my sample block.  You need a background fabric (that was no-brainer, Kona Snow) and two other fabrics, preferably with some contrast and variety against each other.  These were a few of the potential combinations that I pulled.


Decisions, decisions!  Some were obviously not right (too little contrast, too much of one color, etc.) In the end, since I'd already done this block for the quilt in pretty florals, I decided to go with something different.


I wasn't sure how the bold directional print of the Spintastic fabric would work in this block.  You can turn that over in your mind all you want, I mused, but there's only one sure way to find out—give it a try!

So I cut out and arranged the pieces on the cutting table.  Looks like it'll work just fine.


Part 1 of the block tutorial will be up this evening. In the meantime, you might want to start by looking over your stash or scraps (a FQ of each fabric will do).

I hope you will stop back and join me in making this fun block!

Linking to:

Fresh Poppy Design

WIP Wednesday at Freshly Pieced

Monday, June 3, 2013

Housekeeping

I'm doing a little housekeeping around the blog.  I guess I'm supposed to do this claiming thing for Bloglovin'.  Here goes.

Follow my blog with Bloglovin 

I also added "Follow me with Bloglovin'" button on the right sidebar, as well as a Pinterest icon. 

Across the top of the page, I have started to add some tabs, "About" and "Tutorials," for now.  I will add one or more for other things later, such as quilts and flimsies.

You have no idea how long all this tech fussing took me today.  Good thing I didn't have to work until this evening, is all I'm sayin'.

I've been using Feedly some, and now I will try and compare the Bloglovin' reader, but in all honesty, I'm know I'm going to miss the heck out of Google Reader.  I'll be hanging on until the bitter end with GR.

Also a heads up that I'm going to start banging up a tutorial for the Four-Lily Block this week, as promised in my Blogger's Quilt Festival post.  I hope you'll join me for that.  Sharpen your pencils!