Wednesday, August 19, 2020

String Diamonds

Currently in the works is a string diamonds quilt based on the "Diamonds Are Forever" pattern from the book String Quilt Revival by Virginia Baker and Barbara Sanders.

I've had the book for a few years, and the instructions call for using a stabilizer called Sheer Delite to sew the string blocks onto.  It doesn't get removed, just becomes part of the quilt.

Well, try to find that stuff now.  After spending (too much) time searching the internet, it seems to me they may not make it anymore.  Or maybe it's sold under a different name.

So I figured I'd just use my trusty, old faithful phone book pages as foundations.  I have to remove the papers, of course, but I'm no stranger to that process and don't mind doing it.  It's a good thing to do while listening to an audiobook.  I just finished The Alchemist by Paulo Coelho through my local library, using the RB Digital app.

In searching for information on the stabilizer for the quilt, I happened upon a YouTube video tutorial by Tea Quilts. She was also using paper foundations to piece her "Diamonds Are Forever" quilt.  Excellent tutorial, by the way, and she includes instructions to make the kite-shaped template in the description box below the video (click on "Show More" to expand the box).

I use a diagonal line of Elmer's washable glue stick to secure the kite shaped piece to the diagonal of the paper, then just line up my strings along the straight edge and sew away.  No pinning required.  I work on about four blocks at a time, chain piecing them through the machine.  It hasn't been a problem to remove the paper where the glue was.  Even after pressing the block, the glue releases cleanly and there's no problem with tackiness on the fabric.

At first I was going to use black for the background fabric, i.e. the fabric you cut the kite-shaped pieces out of.  But after I made a few sample blocks, I wasn't in love with that color scheme.  Nothing else in the quilting fabric stash really grabbed my attention, but luckily I spotted a big piece of teal colored linen-like fabric that I'd bought to make a dress.  Well, the dress never happened and wasn't going to happen, so I tried making a few string blocks with the teal fabric and loved it!

I think it's cotton (or mostly, anyway).  I remember buying it at JOANN years ago from among the garment fabric bolts.  The weave is somewhat coarser in texture, but it drapes and presses well.  It seems to be doing very nicely in this quilt.

Man, there are some weird, wild, and wonderful fabrics in this baby!  I'm just grabbing from the scraps and strings buckets and bins as I go, trying not to overthink anything.  It's pretty amazing how little of a dent I've made in the strings so far.  Hopefully by the time I get done, I'll notice a reduction.

I've also prewashed and pressed fabric for another quilt that I need to get started on soon.  A whole lot of batik fat quarters here.  This quilt will need to be ready to gift in several weeks' time, so I may have to interrupt the string diamonds quilt to work on that.

I'm probably not going to be able to reveal much more about the batik project while I'm working on it in case the giftee reads this blog.  But I'll be sure to take lots of pictures that I can show after it's all done and delivered!

Thursday, August 13, 2020

Peaks and Valleys

Many years ago, before I had my own blog and when I was just getting into quilting, I followed a few other quilt blogs and made mental note of the quilts I'd like to make some day.  This was before Pinterest, so I likely had those sources of inspiration bookmarked in my browser, in some less-than-ideally-organized system of folders and subfolders.  Sort of like my old recipe files where ripped out magazine pages and scribbled cooking instructions were tossed willy-nilly.  

Who am I kidding, I still do that with recipes.  Only now I'm printing them from the internet instead of ripping them out of magazines.  

Anyway, I finally made one of those quilts I'd unofficially bucket listed all those years ago.  The memory of it drifted back into my awareness as I was making an effort to organize the pile of thrifted shirts on a table in the sewing room.  (Hm, sensing a theme?)

Here is the link to the quilt that inspired me way back when.  Lynn called hers "Dragon's Teeth," but the pattern the quilt is based on is called "Lounge Lizards" by Karla Alexander, found in her book Stack a New Deck.  Somehow, in the intervening years, I'd bought two books by Karla Alexander, but not that one.  So first I had to buy the book I needed. 

I'd been using some solid scraps on the interior sides of the masks I was making, so was in and out of the box of solids regularly.  With this new project in mind, I sorted through the solids and put aside the colors I liked that were also big enough pieces to use.  I decided the background shirt plaids would be mostly blue, to give a sense of cohesion to the background and let the colorful peaks take the spotlight.

Sometimes a quilt is limited in size to the fabric one has available.   That was especially true for this quilt, since it was being made during coronavirus lock down.  I wasn't going to be going to a fabric store (or thrift store) anytime soon.  Although, ideally, I would have made a throw size, this ended up to be baby quilt size, which was just fine.

Once I had the blocks made, it was time to play with the layout on the design wall.  I tried three different configurations.

(Option 1)
(Option 2)
(Option 3)
Ultimately, I chose to go with Option 3, alternating columns of upward peaks and downward valleys.  

As I was putting it together, I thought of possible quilt names.  Maybe "Hide and Seek with Gnomes"?  "Plaid Peaks"?  "Peaks and Valleys?"  

When I posted a picture on Facebook, my cousin Juli said she saw "Vests and Pants."  That made me laugh!  (Once you see it, it's hard to un-see!)

I used a piece of fabric for the backing that had been in the stash for a very long time.  I'd originally intended to make a bag with it, but the statute of limitations had run on that idea, so it was fair game for this project.

Overall, I'm very happy with how it turned out, and I could see making a larger one, throw size, in the future.

I had one leftover block, which, after some multicolored wavy vertical line quilting, became a little mug rug.

There were also a bunch of leftover plaid triangles (cutouts from where the solid triangles went).  I sewed these together and then cut randomly shaped triangles from the made fabric.  

I envision a mini-quilt where these little "trees" are appliqued on a background.  Maybe a winter theme of some kind.  Don't you just love inspiring leftovers?

Linking to:  Can I Get A Whoop-Whoop?

Tuesday, August 4, 2020

Watching and Listening

I wanted to tell you about a series I just finished watching on Amazon Prime over the past few days called A Stitch in Time.  My daughter tipped me off to it recently.  She thought it'd be something I liked, and boy, she was right!

A short description from IMDB reads: "Fashion historian Amber Butchart fuses biography, art and the history of fashion as she explores the lives of historical figures by examining the clothes that they wore."

For me, it ticked all the boxes.  Historical methods of clothing construction?  Check!  Art history?  Check!  Social and cultural conditions from the period?  Check!

In each episode, a small team of historical costumiers recreate a garment depicted in a period painting, which the show's host then models at the end of the episode.  They use materials and sewing methods that would have been used during that period.  The presenter may visit museums where similar pieces of clothing are held and preserved.  The garment is discussed in terms of how the fabric was produced at that time, what societal issues were in play, etc.

My only wish is that each episode were longer...and that there were more than one season.  Okay, that's two wishes.

It was originally produced in 2016 and, I assume, aired on British TV at the time.  I'm not sure how long it's been available on Prime.  I think it's also available on AcornTV.

Anyway, I loved it!  Maybe you will, too.

I listen to a lot of podcasts while I'm sewing.  Some of my favorites are Revisionist History with Malcolm Gladwell, Hidden Brain, This American Life, Armchair Expert with Dax Shepard, WTF with Marc Maron, and many more.

Usually that's more than enough to keep me occupied in any given week, but the other day I explored a couple of recommendations that popped up for sewing-related podcasts.

One that I liked is called Stitch Please.  I've listened to about three episodes so far but plan to go back and listen to more.  I especially enjoyed the episode called "Sewing Supplies Beyond the Fabric Store."  Check it out in the link or wherever you get your podcasts (I use the Stitcher app).

And I am late to the party for The Great British Baking Show, but I've also been working my way back through all the seasons of that on Netflix during the past couple months.  Love it!  That was another one my daughter suggested a year or more ago already.  Took me a while to get around to it, but I'm glad I did.

One of the reasons I hesitated was because I thought watching it would make me want to bake (hence eat) more sweets, and I already struggle with keeping my sweet tooth in check.  But it really hasn't had that effect, thankfully. 

I thought I knew how to bake pretty well, but it turns out there's a LOT I don't know (like, most things!).  Getting to know the contestants and seeing their creativity shine through in their bakes is a treat.  And who can resist the way Paul Hollywood says "spoonge" or those ice-blue eyes?

How about you?  Any recommendations for must-see series, movies, or podcasts?


Sunday, August 2, 2020

Sunday Sundry 8-2-20

Perfect is the Enemy of Good
Oh, the posts I write in my head that never make it to Blogger!  I'll see something interesting, think about exploring this or that idea, and on and on...but it's all subject to a not-so-magical disappearing act all the same.  What was I going to write about?  Poof, it's gone.  Does that happen to you?  I bet I'm in good company.

Well, this week I started jotting down some of those ideas.  I probably won't cover a lot of them, but for today I'm resurrecting my old Sunday Sundry theme and we'll see if we can tick a few off the list.  Random things, in no particular order.

For the Birds
I love watching birds, ever since I was a little girl.  Listening to their songs, seeing and touching their feathers (dad was a hunter, and we had parakeets), marveling as our neighbor painted them on canvas or crafted decoys.

Two birdie highlights this week:

1) We have a pair of hawks hanging around in the yard.  They appear to be juveniles, maybe hatched from the same nest.  At first I thought they were Cooper's hawks or maybe sharp-shinned hawks, but their call is what sets them apart.  They sound like a kitten mewing!

It's different sounding than the catbird that we regularly hear in the mulberry tree.  We've seen the hawks flying from tree to tree and followed their calls as they perched in the branches.  They're skittish and wary, so getting a good photo isn't easy.  I tried.

From what I can gather doing a little research, I think they're red-shouldered hawks.  You can hear how they sound HERE.  I don't know how long they'll hang around, but I think it's very cool that they're visiting!

2) We took a walk on a nature trail around a local marsh early one morning this  week.  While there wasn't much doing on the water, at a certain point along the trail my gaze was drawn upwards where a group of about 50 pelicans were circling in the sky directly overhead.  Happily gliding on thermals, glimmering white bodies in the morning sun, black-tipped wings outstretched, around and around like slow-motion figure eights.  Absolutely mesmerizing!  Of course, that's the day I didn't have a camera, but it made my heart happy!

Strange Materials
We visited the Museum of Wisconsin Art recently.  We have an annual membership and usually get there a couple times a year, but like most places they'd been closed during the early months of the pandemic.  It was a nice little getaway from home, and it wasn't at all crowded (and we wore masks, of course).  This exhibit looked like a neat pattern on the wall around a large painting, but on closer examination, it was something else!

All the pattern work is done with cicadas!  The bell jars have other insects posed in interesting vignettes.  Quite creepy-cool!

Here's the blurb that went with the exhibit, if you're wondering how or why.

In case you need a palate cleanser after that, there was some interesting fiber art and mixed media as well. 

I especially enjoyed Chrystal Denise Gillon's whimsical collage series on sardine cans called "Mama Says."  I could relate to a lot these!


From "Mama Said" series by Chrystal Dillon


Okay, I think that's going to be it for today.  Not perfect, but good enough.  I'll leave you with a little mini I made after sorting through the scrap drawers. 

I've started a string quilt, which I'll talk about another time soon.  Found some tiny yellow squares among the strings, just itching to be something, so I made this little mug rug. 

Here's the back.

How about you?  Tell me something from the past week or two that hasn't made it to a blog or social media post.

Sunday, July 26, 2020

The Kitchen Project

Last fall, I wanted to take down the old wallpaper in the kitchen and paint the walls.  My soon-to-be sister-in-law offered to help, I said okay, so we did and it turned out great! 

The End.

Just kidding!  Yes, we did remove the wallpaper and paint the walls, but no, that wasn't the end.  It was just the beginning.

(Dining area of kitchen - Before)
This will be a familiar story to many of you.  You want to do One Thing, but that leads to Thing Two, which can't be done until Thing Three happens.  And if you're going to do Three, then you may as well do Things Four, Five, and Six.  And also Seven and Eight, while you're at it, because that just makes sense.

But I'm not complaining one bit!  I am very glad we did all the Things, and I am enjoying a refreshed looking kitchen that makes me happy to spend time in it.

(Kitchen - Before)
Now if you're thinking this recap is going to rival an episode of some popular home makeover show, please allow me to adjust your expectations.  No walls were removed, no square footage was added to our tiny kitchen, and the flooring and cupboards all remained the same.  In fact, I still have the door missing on one of my cupboards; after three requests to have the contractor come back and put it on with the new hinges it needed, to no avail, we've pretty much given up.  We are becoming resigned to the "open shelving" concept in that corner of the kitchen...*sigh*...almost.

First, I must tell you that I have a total gem of a soon-to-be sister-in-law!  Her name is Karrie.  During the past few years, I've seen the magic she's done in her own home and also in getting my brother's old house ready for sale.  She has that wonderful eye for design and flair for decor that some people seem to be naturally born with.  Other people, like me, do not have this in their DNA.  What a gift it was to have Karrie's input and skills when it came to my kitchen!  I trusted her judgment and told her if she had any ideas or comments to just give it to me straight, and she did!

In the late '90s, I'd taken the old wallpaper off the kitchen walls, but (like an idiot) I put wallpaper right back on!  Ugh...what was I thinking?  Well, I guess that was the thing back then.  Some of my friends tell me wallpaper is back on trend again.  What goes around comes around, I suppose, but it's not for me anymore.  The kitchen was the last remaining room in the house with wallpaper and it was time to say goodbye.

(Removing wallpaper - this was an easy section)
It took a while and a lot of elbow grease (and vinegar and razor blades), but it finally all came off.  Then there was the matter of fixing the walls underneath.  More scraping and patching and sanding to get them smooth.

But before the walls could be painted, the ceiling needed painting.  That took two coats.  Then the walls were primed and textured and painted.  Karrie did all of the painting herself.  She's such a skillful painter.  Here she is with a tiny brush painting the little gap between the window trim and the bulkhead above the sink.  No sweat! 

(Karrie painting above the window)
Somewhere along in the process, she suggested we update the 1970s dark walnut stained baseboards by painting them a creamy off-white.  The doors were also walnut—there were no less than four of them in and around the kitchen—so it seemed natural to redo those as well.  We ended up buying four new six-panel doors and painting them to match the baseboard trim.  Of course, that meant new door frames as well, so a carpenter came in for half a day to hang the new doors.

(Old walnut doors and trim)
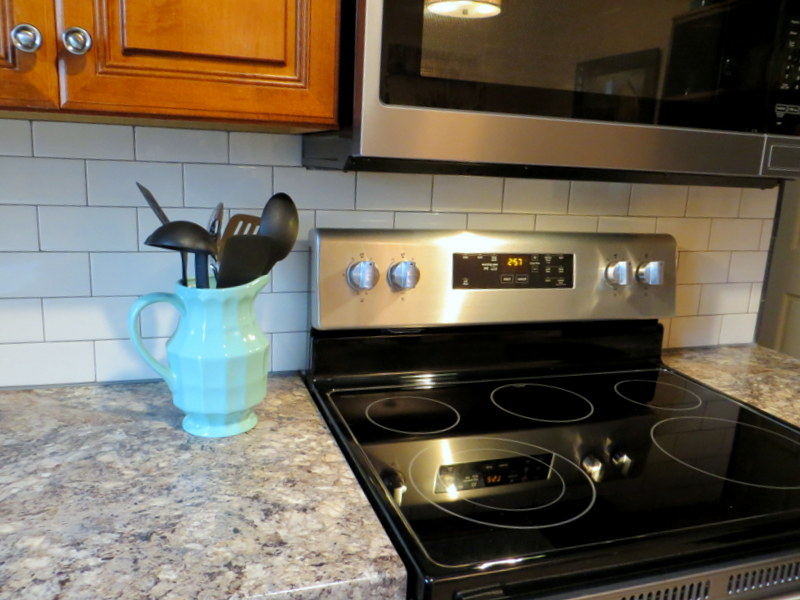
It had also been noted that my kitchen countertops were looking kind of sad and dated.  So we decided to replace the countertops—which meant a new sink and fixtures, of course—and why not do a complete tile backsplash while we're at it?  (The old backsplash was just a single run or so of green tile.)

(Karrie and Darrell working on the new trim and doors)
And let's also get new appliances ordered—in for a penny, in for a pound—replacing the '90s era stove, refrigerator, dishwasher, and microwave with stainless.  It took some research to find a refrigerator that would fit the space the old one had occupied (fridges are taller and wider these days) and to find a microwave that was just right for the space above the stove. 

(Countertops and appliances going in)
Finally, all the appliances arrived, and a different contractor we'd hired for the countertops came and put everything in and did the plumbing for the sink and dishwasher.  Turned out we needed some extra plumbing work done for it all to work, but he was able to do that the same day and get it done.

(Dove gray tile to right of faucet)
When it was time for the tile work, Karrie and my brother Darrell volunteered to do it themselves.  I'd bought a pretty dove gray tile for the backsplash, but after part of it was already up on the wall, Karrie noticed it seemed to be too dark and made the kitchen seem smaller and dim.  I was a little surprised when she suggested we change course midstream, but again, I completely trusted her eye for that kind of thing. 

(Darrell taking off the gray tile)
So as my brother knocked off the gray tile put on the day before, Karrie and I ran to the local home improvement store and bought a completely different, biscuit colored subway tile.  It cost quite a bit less than the gray tile I'd originally bought, so that was a nice silver lining.  And she was absolutely right on about the lighter colored tile.  It looks so much better and brighter in the space.

(New subway tile backsplash)
Then it was time for the fun part, decorating!  I once again deferred to Karrie's eye.  She found a cool, vintage-looking fabric to make new kitchen curtains (and whipped them up herself).  She used a few pieces of furniture and decor hiding out among the cobwebs in my basement and re-imagined/repurposed them for the kitchen. 

(Antique Ethan Allen chest and hutch)
One of the coolest transformations was this solid maple Ethan Allen chest and hutch from my husband's childhood.  I had been using the lower chest in the dining room as a side table, and the hutch that sits on top had been relegated to the basement for storage.  Karrie brought them together again in the kitchen!

(Restyled chest and hutch)
She painted the piece black and lightly distressed it.  Put a wood applique on the front for a little flourish and changed out the hardware. 

I asked my brother to cut a hole in the back of the hutch so I could thread a cord through it for a power strip so we could use it as a charging station for our electronics while hiding them behind the door.  And hide the mail and papers!


Karried styled the shelves by wandering around my house and pulling together vintage and other things I've collected over the years, as well as adding a couple of her own items.


We picked out a new table and chairs that fit the space and our needs from Wayfair. It's perfect for hubby and me in our eat-in kitchen.


The old window was something I had in storage in the basement for at least 15 years.  I'd intended to repurpose it in some artsy way for wall art, but never really had a definite plan.  But Karrie had a plan!  She painted it to match the cream colored trim in the kitchen and decorated it just so, adding a couple vintage coat hooks, and used some of the leftover fabric from the kitchen curtains.  I hung a couple vintage kitchen items on it, she added a wreath, and voila!

(Vintage paint-by-number in custom frame)
She and my brother also made a different frame for one of my beloved vintage paint-by-numbers and made that into proper wall decor as well.  We teased back and forth a little on that, but after a bit of eye rolling, she came around to the idea of using it in the kitchen.  He-he! 

(Dining area of kitchen - After)
All in all, it took from about mid-September to mid-December to finish the job.  I really enjoyed all the conversations and laughs we had together in the process...getting to know each other better...all the little twists and turns, etc.  It was altogether a great couple of months, giving the kitchen the update it needed.  The whole thing just makes me smile!