I have started working on the Tea Towel Challenge quilt again. I use the term "working on" loosely, as my idea is basically to make a bunch of stuff and see what sticks.
So far another border has been applied and now I'm piecing some shapes that resemble feathers (or leaves, flip a coin). I'll show you how I'm making those in a minute. I'm sure it's not unique, but it is fun and I like to share.
About the narrow border first. You may recall that I sometimes like to use recycled fabric from clothing, etc., in quilts. A few years ago, a fellow blogger was willing to part with a sleeve from a funky 1970s shirt she had thrifted, and I was happy to accept her offer.
When I pulled fabrics for the Tea Towel Challenge a few months ago, that shirt sleeve was among the possibilities, albeit a remote one. It sat on the pile and eventually fell to the sewing room floor the other day, forcing me to take note of it again when I picked it up.
One thing led to another and before you know it, I had it sliced into strips and banged on as a border. It seems to work, I think, and it makes me smile that I was able to use it after all.
Now the feathers (or leaves, whatever). I'm excited about those! They started as trimmings from the orphan blocks I recently made into quilt-as-you-go-blocks for a charity quilt.
The black strips are cut 1 inch wide and the white strips are 1-3/8 inches (only because I was cutting a 2-3/4 inch strip in half). I cut all the strips about 4 inches long. Each feather/leaf uses 8 white strips, 6 black strips, and one longer black strip, about 7 x 1 inches, for the center.
Then I laddered and sewed them together, 4 white and 3 black per side, alternating white and black strips. Since they were to be trimmed at an angle in the next step, I offset the edges by about 3/8 inch as I sewed each strip on.
To trim them, and give them the proper angle, I placed both sets along the 60-degree line on the cutting mat. One set is placed wrong side up, because it will mirror the other set, as you'll see further below.
Trim along the line.
See how that works? Then you sew the longer black strip down the center.
For the shape, I made a paper template by folding a 7 inch square of paper into fourths and cutting an oblong, fat feather shape. Then I traced this onto my pieced fabric and cut it out.
Pretty cool, huh? They're ready to applique, whenever I figure out exactly how I'm going to incorporate them into the Tea Towel Challenge quilt.
Right now, I'm just having fun!
Linking to:
Sew Darn Crafty
Linky Tuesday
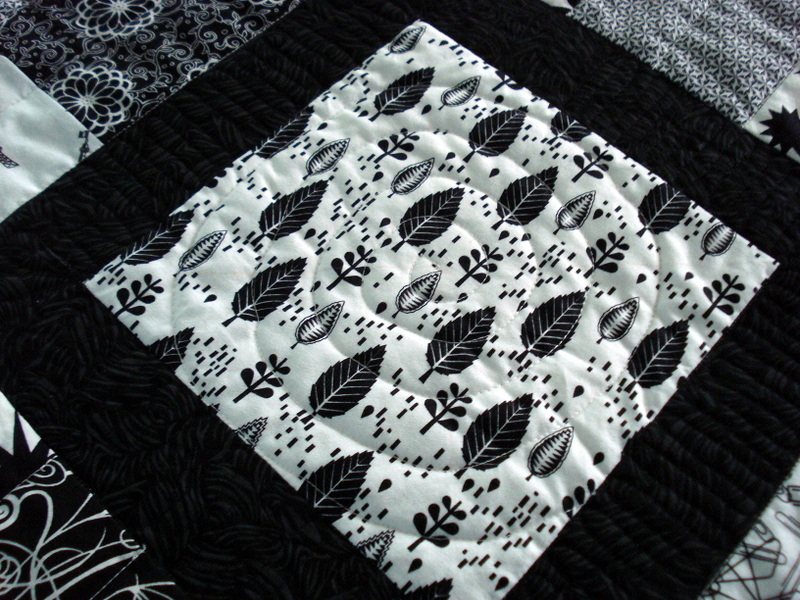
Finally, a finish! That is a good feeling indeed. The black and white quilt that I pieced over two years ago has been quilted and bound.
And I lived.
Seriously, the actual quilting is not my favorite part of making quilts, but this was kind of fun once I got into it. Once I gave up the idea of quilting a perfect spiral, that is.
Shay reminded me that imperfect, scribbly style quilting is called "organic." To which I responded that this quilt may be so organic it attracts flies!
But the spirals got better each time. No buzzing was noted in the vicinity.
Having practiced all those circular motions, I moved on to the narrow stop border and did more circles. Organically, don't you know.
My outer border was a wee bit ripply, I noted as I was basting it. I fought the urge to remove and resew it and instead hoped it would quilt out. A little meandering in that area seemed to do the trick.
Then I went back to the frame borders in the interior and did a back and forth stitch. I really like how that turned out. After quilting down one side, I was in the zone and went on to finish them all in one sitting.
Finally, the little red patch. I changed thread to red and quilted a little daisy with some pebbling (very organic, ahem) around the outside.
It took longer yesterday to hand bind the thing than anything. I intended to machine bind it, but hand binding is sometimes what happens when you take too generous a seam.
After binding, it was time right away for pictures, since it was the perfect kind of overcast (plenty of light but no glaring sun). Then the quilt was nap tested. It passed.
You can see the quilting better from the back. I had in mind a zen
garden kind of thing, thus the straight lines, spirals, pebbles, etc.
The original plan was to quilt it somewhat differently, but after getting reacquainted with the quilt as I was pin basting it, an alternate idea took shape.
I don't have a clever name for this quilt, but I thought of this song. To call a song a rag is one thing, but a quilt, well, no. Anyway, both the song and the quilt make me happy!
Linking to:


My sister admired the Carpenter's Wheel wall hanging I made around the holidays last year, so I put one together for her last weekend. She likes jewel tones, and I had a couple of older Christmas fabrics left over from Mom's stash that I thought would be nice to use.
Instead of a plain lighter background, I used a text print with seasonal greetings that a friend gave me. I'm not sure if it works or just makes the whole thing too busy. It's a horse apiece, in my opinion.
But if Sis doesn't like it, I'll make her another one, and this will either become a gift or I'll hang it in the hallway.
The backing is a thrift store fabric find from earlier in the year. I love that shade of vintage-y green. All the Christmas fabrics have a metallic bit to them.
Although I haven't (and can't yet) show pictures of everything I've been working on, I am happy to have knocked out six wall hangings/minis/table runners, a half dozen pillowcases, and a few pairs of jammy pants over the past several weeks, and all that while the sewing room has been in a state of flux. I feel pretty good about that!
One more thing to leave the sewing space last weekend was the 20-year-old TV. It took both of us to haul the old behemoth up the stairs and finagle it into the back seat of the car because it wouldn't fit in the trunk. We drove it immediately to Goodwill, where a stocky 20-something young man at the drop-off door came out to greet us. After watching Norm labor to get it out of the car, he took it from him and then in one fluid maneuver rolled the whole set up onto one shoulder and walked into the building with it, saying, "Oh, it's not that heavy." Norm and I walked in behind him, eyeballing each other and thinking the same thing: Show-off.
Did you ever do an internet search for quilt ideas and be led back to your own blog? Well, I can check that one off my list now.
I was looking to do something with a beautiful Moda Swiss Holiday charm pack I'd won in a giveaway earlier this year. I Googled charm pack quilted table runner ideas, and after following this link and that, I ended up on somebody's Pinterest page where I saw that this nice person had pinned my own Scrap Challenge Block.
This block is pinned in real life to my design board just to the right of my sewing table, but you know how it is when you look at something so often you don't even really see it anymore? Or how you can miss the forest for the trees, or, in my case, the trees for the forest? Yeah, I'm kinda good at that. I have had people I know wave at me from five feet away, but I didn't see them because I was looking over their heads to a vantage point 20 feet beyond. I did that on election day to my neighbor. I've done it to my niece at an adjoining restaurant table. And try explaining that you aren't purposely snubbing someone, just being your usual preoccupied/absentminded self. So embarrassing.
At any rate, it was nice to be reminded of that block in however roundabout a way. Let's call it serendipity. No really, let's call this table runner Serendipity. (My first idea was to call it Triple X, but on thinking of the kind of traffic that might generate, it seemed appropriate to reconsider.)
I started by taking the charm pack apart and separating the squares by pattern and then by light and dark, large scale print and small scale, etc. I determined that I could make a runner three blocks across using the Scrap Challenge Block as the basis.
Here is how it went together (click on photos to enlarge).
Each block will have a grouping of 2 light fabric squares and 2 darker squares. I picked the large scale prints for my darker ones. I'm calling these the background squares.
In addition, each block will use 4 other squares for the corners. I used 2 almost "solid" squares and 2 small scale prints for these corner pieces.
You will make 3 X-shaped blocks for the table runner. In the below photo, you can see the groupings I used for each block, arranged in 3 columns from left to right. (Note that there are 2 identical charm squares stacked one on top of the other, which you can't really tell from the picture. Just remember to use 2 of every fabric shown.)
Next, cut your background squares in half on the diagonal:
Then take your corner squares and cut a 1.5 inch strip off the side of each. From the section that's left, cut a 3.5-inch square. Further trim the 1.5-inch strips you initially cut down to 1.25 inches and set these aside. These 1.25-inch strips can be used when you assemble the strip sets later on.
Take the 3.5-inch squares you just cut, and cut them in half on the diagonal.
This is what you should have so far:
You will also have a bunch of uncut charm squares left over. Select about a dozen of these.
You will then cut your selected charm squares into four 1.25-inch strips.
Combine all your 1.25-inch strips, in a pile. Well, really there's no law that says you have to make a pile, but I am a piler so that part makes me happy.
Now you can start reassembling them into strip sets of 4 strips each. Mix it up, vary your strips, and have fun with it.
You are then going to sew your 4-strip sets back together to make 12 strippy sections for your blocks. (You will have some strips left over, which you can use for something else, like a mini or get creative with your backing perhaps—or toss 'em; you won't hurt my feelings.)
At this point, I laid out all the pieces into 3 blocks, just to make sure I had it fixed in my mind how to sew these together. I fiddled with the layout a little bit, swapping strip sets here and there until I was happy with the overall look of each block.
 |
| Block 1 |
 |
| Block 2 |
 |
| Block 3 |
Now it's time to sew the units together. By unit, I mean one strip set, two background triangles, and two corner triangles:
First, take a strip set and sew the larger background triangle pieces along the long sides of the strip set. Your strip set and triangle pieces won't match. In fact, your background triangles will seem way too big. They are.
Here's a tip: The ends will overlap the strip set by one inch on the top and bottom edges. I lay it on my cutting mat so I can equalize the overlap (centering the triangle placement) and pin at top and bottom. Sew along the long edges, being careful not to stretch the bias of the triangle piece. Just let it flow under the presser foot, nice and easy.
Press these triangles out and then trim the overhang even with the strip set. I have rotated the block in this photo for trimming, but don't let that throw you.
Now take your corner triangles and sew them onto the remaining edges. This time, your triangle pieces will fit better. No need to stretch or pull to make anything match, just center the point of the triangle using the center of the strip set as a guide. Easy peasy.
Press the corner triangles out. And what's this? It looks wonky, oh dear! Never fear, we're going to whack it down to 5-7/8 inches square. It will be okay.
Yeah, that's a weird and seemingly fiddly number, but your corner points will match really nicely this way, assuming you use a scant 1/4-inch seam allowance. Just pay attention, especially with the first edge you trim off, that you have left a 1/4-inch seam allowance at the corner pieces. See the asterisks on the photo below (which I magically cropped in my photo editor because I forgot to take a picture of the actual trimmed block. I think you get the idea.)
Once all your units are sewn together and trimmed, you can then sew each of your three blocks together, then join the blocks into your table runner.
Ain't she purdy?
Quilted and bound, it measures about 32 x 11.25 inches.
If you have any questions or if something isn't clear, let me know. And if you make one, I would love to see it!