Welcome to Part 3 of the Four-Lily Block Tutorial. If you've been following along with Part 1 and Part 2, you know that we have tackled templates and conquered curves. Today, we're going to win over Y-seams!
Although winning sometimes implies a struggle, and this is nothing of the sort. In any case, if you haven't done one before, perhaps this will win you over to Y-seams.
We're going to put together the four Lily Units, which consist of Pieces B and C. B is the triangular shaped piece and C is the piece that looks like a flower.
After we get the Lily Units together, we'll sew them on either side of the remaining two Corner Units made in Part 2. We'll end up with two sections that look like this:
First, we need to take the Frixion marking pen (or whatever fabric marker you prefer) and make a dot 1/4-inch in from the edges at the point of triangular Piece B, and do the same 1/4-inch in from the edge at the "V" of Piece C.
On lily-shaped Piece C, we need to stay-stitch for about a half inch on either side of the dot, about 1/4 inch from the edge at the "V." The reason we do this is because we will need to clip to that dot later (don't do it yet), and stay-stitching helps stabilize the fabric in that spot. Use a slightly smaller stitch length for this.
Then place Piece B right sides together on C, matching the center dots and matching it along right edge of C. If cut precisely per the templates, these pieces should fit together just right; i.e., there shouldn't be anything to ease and no part of B should hang over the end of C. Sew these pieces together, starting at the dot and stitching to the outside.
After sewing that seam, hold the background piece away at the "V" of the lily-shaped piece C, and clip to the dot of Piece C only. Be careful not to clip through the stay-stitching. Just Piece C gets clipped, nothing else.
Because you have made the clip, now it should be easy to simply pivot the fabric to align the other edges of Pieces B and C.
At this point, I flip the piece over and pin from the other side, because we're going to sew again from the center dot to the outside.
And that's it! No need to whine about Y-seams—you've done it! YaY!
Now do that three more times for the other Lily Units. Press the seams downward toward Piece C. Again, use a DRY iron for all pressing.
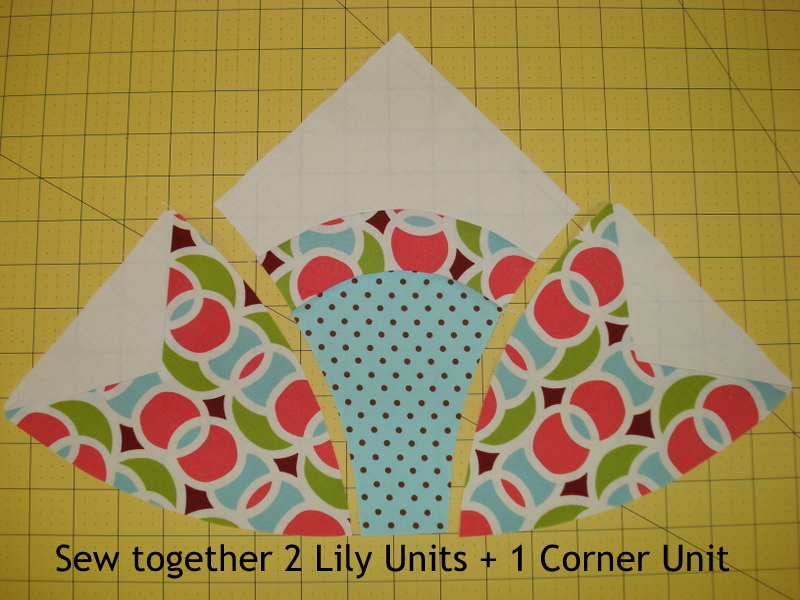
Once you have all four Lily Units made, sew one on either side of a Corner Unit. You will make two of these Lily Unit + Corner Unit + Lily Unit combos.
Again, we will use the fold, crease, mark, and match technique discussed previously. For example, with the Corner Unit, fold the piece in half along the edge to be matched and finger-press a small crease at the folded edge.
Then fold it in half again and finger-press at the fold. Repeat for the other edge of the Corner Unit.
Do the same with the Lily Unit. Fold in half along edge to be matched, crease; fold in half again, crease. (Note: You only need to mark one edge of each Lily Unit, the edge to be sewn to the Corner Unit.)
Mark all the creases with a hash mark using your marking pen.
Sew one side of the Corner Unit to one of the Lily Units. Remember "Thinking of U" to keep the U-shaped edge on top.
Match the marks at the centers of the pieces and pin. Then match and pin the left and right ends. Then match the remaining marks and pin.
Sew these pieces together. Again, take your time, keeping the edges aligned as they go under the presser foot, maintaining a scant 1/4-inch seam allowance, and removing pins as you come to them.
Finger-press toward the Lily Unit. (If you choose to press with your iron at this point, be careful to avoid ironing over the registration marks on the other side of the Corner Unit, if you have used a Frixion pen, because they will vanish with heat.)
Repeat the process to sew the other Lily Unit to the other side of the Corner Unit.
Make a second Lily Unit + Corner Unit + Lily Unit combination.
We're almost there! I hope everything has gone well for you so far.
Coming up in final Part 4, we'll put every together and finish the block!