
In the last post, I introduced the newly available acrylic templates for making the Four-Lily Block. With its gently curving pieces resembling flowers in a ring, this block is a fun and interesting one to make. It’s the basic block in the Thoroughly Modern Lily quilt, but I hope it sparks your imagination and creativity for any project you may have in mind!

You can check out the Four-Lily Block Instructions (free downloadable PDF) and peruse the original four-part blog tutorial, both available on the Tutorials tab at the top of the page. If you’re wary of curved piecing or anxious about y-seams, the detailed step-by-step tutorial walks you through the process so you can stitch this block with confidence and ease.

The new acrylic templates were a game changer for me, making rotary cutting possible for the uniquely shaped pieces of this block.
Today I’m going to share some tips and suggestions that you may find helpful when using these templates. Let's get started!
Tool Tips:
If you have a standard 45mm rotary cutter and mat, you should be good to go. However, I found the following optional items also helpful (links here are for illustration purposes only, not affiliate links):
- 28mm rotary cutter, especially for the concave curves of Pieces A and D.
- Rotating cutting mat.
- Non-slip silicone grips for quilt templates.
And no matter what cutter you're using, make sure it has a new, sharp blade!
Fabric Cutting Tips:
It’s easiest to cut your fabric into strips first, the size of which depends on the template piece you’re working with. For example, to make one Four-Lily block, cut your fabric as follows (click on a photo to enlarge, to better see template placement):
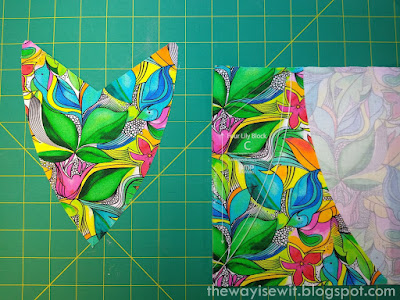
Starting with Piece C, using the half-shaped template for rotary cutting:
- Cut a strip of your main focus fabric 8 inches x width of
fabric (WOF).

- Place the strip right side down and fold back 3.5 inches
from the selvage edge of the strip.
Place your half-shaped template for Piece C along the fold created. Hold the template steady against the fold
with one hand and start cutting from the bottom point of the template up along
the right side, across the top, and then down toward the fold line.

- I found it helpful to use a couple of silicone
grips on the underside of this template to keep it in place while cutting.

- After cutting your first piece, fold the fabric in another
3.5 inches and repeat. Continue to cut,
fold, cut, fold, until you have all four pieces needed for the block. It really goes pretty fast!


Piece D cutting can make use of the fabric left from cutting Piece C:

- Take what’s left of that 8” strip
and fold it in half lengthwise. You can then
cut two Piece D at a time from this doubled strip of fabric. You’ll need to cut
a total of four pieces.


- A smaller 28mm rotary cutter makes navigating the concave part of this template easier. If you don’t have one, just go slowly with your standard cutter. A rotating cutting mat allows better access to all sides of this template without having to reposition your body and/or the fabric, but if you don’t have one, take your time and adjust as necessary.


Piece F can be cut from a small scrap of what’s left after cutting Piece D, since you only need one 1-7/8” square from your focus fabric.
Moving on to your second fabric and Piece E:
- Cut a
strip measuring 6.5 inches x 20 inches.
Then fold this strip in half so that it’s doubled, wrong sides together,
now measuring about 6.5 x 10 inches.

- Align the straight edge of template Piece E with the straight lower
edges of the fabric. Since you’re
cutting two pieces at once, cut two of this template piece, rotating it in the
opposite direction and aligning with the other straight edge for the second
cut. You’ll then have four pieces total.


Pieces A and B from background fabric:
- Cut a 6.5-inch x WOF strip from your background fabric
(white in this example).

- For Piece A, I
folded the WOF strip so that I could cut four layers of fabric (and all 4 pieces) at
once. Again, if you have a smaller 28mm
cutter, you may want to use it on the concave curve of template A.

- Finally, using what’s left of your background strip, cut 4
of Piece B. Once again, I folded the strip of fabric so I was cutting four layers of fabric and all four pieces needed at the same time.


That’s it! Here are all the cut pieces laid out on the design board and ready to sew.

I hope that was clear and helpful. If you have any questions, please feel free to leave a comment and I’ll address it.
One more thing...this fabric—I may be slightly obsessed with this Fantasy
Garden Collection from Benartex! I bought it at the local Nancy Zieman Productions store, but it’s available online from there
and elsewhere. I only got four of the prints, but it was tempting to buy a FQ bundle to have them all!

I’m thinking of making a table runner or possibly a baby quilt with four of the Four-Lily blocks. What possibilities can you envision? Perhaps a cute bag? A wall hanging or table topper? How about a scrappy throw quilt, or simply a block for your next sampler? I’d love to hear your ideas!
~Paulette


