Showing posts with label Free-motion quilting. Show all posts

Monday, May 10, 2021

Fabric and Finishes

As mentioned in the previous post, my daughter recently brought me two big bags full to the brim with fabric from her coworker.  Here it is on my cutting table after I took it out of the bags and grouped it by colors and thus loads that I could prewash together.


I am allergic to cats and dust (not that you'd know it by the usual state of my housekeeping), so I  prewash everything before incorporating it on my shelves.  Time consuming, yes, but I actually enjoy the opportunity to pet each fabric individually as I take it out of the washing machine (and cut apart the mess of strings), dry the load, and then press each piece one by one.

It took about 10 days to get all of this new-to-me fabric sorted.  Here is everything afterwards, stacked on the cutting table.  There's some great fabric here!  The biggest piece is 3 yards of a Christmas print, but many yard and half-yard cuts, and a whole lot of fat quarter sized pieces.


I am so grateful to this person who wondered what to do with the fabric left from mask making in 2020 and passed it along my way.  I will certainly use it!  

Now for the finishes.  Several months ago, Jo of Jo's Country Junction connected me with a woman named Evelyn in California, who had a flannel quilt kit and a some other UFOs to be finished.  I agreed to finish them for donation.  You may have seen this pretty flannel quilt finish recently on Jo's blog (HERE and HERE).  


After I had pieced it, I sent it to Ray in Florida, a longarm quilter who finishes many donation quilts that come to him through Jo.  It was larger in size than I normally feel able to handle quilting on my regular sewing machine, so I asked Ray if he would be willing to longarm quilt it, and he agreed.  He did a beautiful job!  You can read more about this quilt in the links above, but here is a closeup he sent me of the quilting.


Then this weekend, I finally finished the second UFO from Evelyn.  She had sent some beautiful, neat-as-a-pin redwork embroidery blocks of cute animals, along with the instruction sheet to complete the red and white quilt and fabric to do so.  

Her blocks were so well done!  I really wanted to do her handiwork justice in finishing this quilt.  Here it is pieced together and on the design wall in mid-March.


I did use a different "white" when piecing the borders of the quilt (Kona Snow), as it matched the background of the redwork better than a true white did.  I pieced the backing from some of the other red and white fabric she'd sent, plus added a bit of my own to make the backing big enough.


Then it was time for me to quilt it.  The size was ideal for me to handle, at about 45 x 55, but how was I going to quilt the embroidered blocks?  I had a couple vague ideas, but no concrete plan, so I put the basted quilt aside for several weeks to allow my trepidation to settle.


Last week, having procrastinated long enough, I started in on the ditch quilting.  I still didn't really know what I was going to do around the embroidery, but I know that when I finally get over myself and take the first baby steps, momentum usually takes over. 


And so it did.  Ultimately, I just went with the flow and let the spirit and needle lead the way, block by block.  Over the course of a couple days, it was quilted!


Some blocks may be a little more inspired than others, quilting-wise, but overall I think it turned out well.


I used some red fabric from the new influx of scraps mentioned above in binding the quilt.  There was a long red scrap on the lengthwise straight of grain, which was perfect for this quilt.  


Having quilted more densely in the center than the borders, they threatened to become a bit wavy.  The lengthwise-cut binding helped corral it and made for a nice straight edge.


I will be donating this quilt to Quilty Hugs for Happy Chemo as part of the Hands2Help Comfort Quilt Challenge 2021.  I hope whoever receives it will be uplifted by the playful, whimsical critters in this pretty red and white quilt.  Thanks again to Evelyn for entrusting a few of her projects to me to be finished, and to Jo and Sarah for connecting a community of charitable quilters!

Wednesday, February 12, 2014

Come to Light

It's been quiet here on the blog for a week, but I have not been sitting on my hands.  Still working my way down the UFO list. 

I wanted to relay my second experience with the Coats thread I mentioned in previous post, because I don't want to give anyone a bum steer.  I've been using it as the top thread in the current project, with Aurifil in the bobbin.  Remember how I said it didn't shred?  Well, in the words of The Dude in The Big Lebowski (still one of my favorite movies):
I'm not sure if it's because I was quilting with a walking foot last time and now I'm free-motion quilting, or maybe it's as simple as one being polyester and the other cotton; but this same Coats thread unwinds itself at the ends (frays, shreds, whatever you want to call it).  By contrast, the Aurifil bobbin thread stays nice and tight.  You can see the difference in the two threads in the photo below.
I am burying my thread ends, and I don't think it'll be a problem in this wall hanging, which won't get a lot of manipulation like a bed quilt would.  But there's that, just so you know.
Karen gave me a tip on a great sale on Aurifil thread at Sue's Sew EZ Designs.  She's closing her shop soon.  I'm going to stock up on a few spools in different colors so I have some on hand.

We had workmen here two days this week installing a new whole-house humidifier which attaches to the furnace.  Our old April-Aire gave up the ghost during the depths of the recent deep freeze with high-pitched squealing and banging noises.  The new unit, a Honeywell, went in on Monday but got unplugged by Tuesday when it was determined it was defective.  We wouldn't have known anything was wrong except our neighbors called to advise us that our air conditioning unit outside was running underneath its winter covering!  That side of the house faces theirs, and we would've had no clue this was happening had they not called.  Apparently, the problem was more than a wiring issue, so a new unit has been ordered and should go in next week, hopefully uneventfully.

While the workers were here, I was happily holed up in the sewing room quilting "pearls on a string" while listening to Led Zeppelin.  I've never been a big fan of Robert Plant's voice, but I love Jimmy's guitar.  Here's one of my favorite Zep tunes, sans vocals, by a guy who seems to be channeling Page.  Sing along if you like!  There's even cowbell at 1:20.

Let me take you to the movie
Let me take you to the show
Let me be yours ever truly
Can I make your garden grow?

Yours ever truly ~ Happy Valentine's Day!

Tuesday, August 20, 2013

Black and White

Finally, a finish!  That is a good feeling indeed.  The black and white quilt that I pieced over two years ago has been quilted and bound.


And I lived.

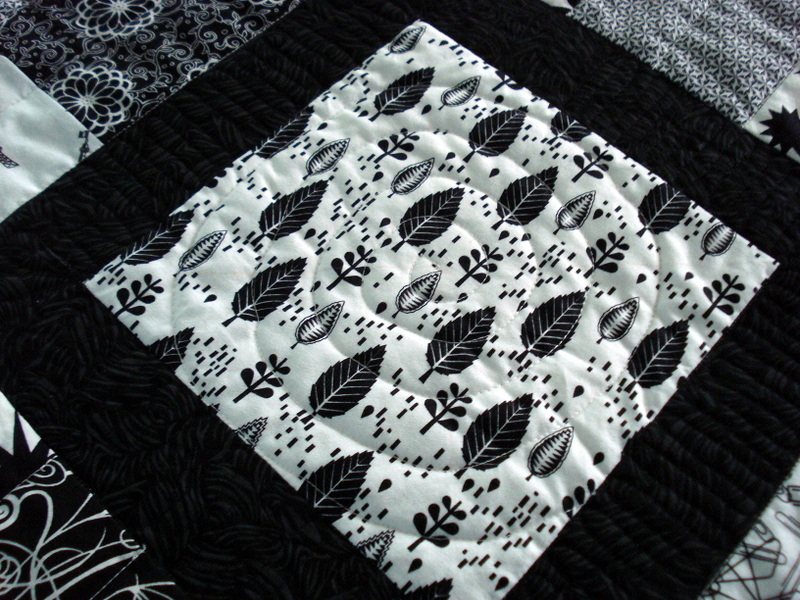
Seriously, the actual quilting is not my favorite part of making quilts, but this was kind of fun once I got into it.  Once I gave up the idea of quilting a perfect spiral, that is.


Shay reminded me that imperfect, scribbly style quilting is called "organic."  To which I responded that this quilt may be so organic it attracts flies!


But the spirals got better each time.  No buzzing was noted in the vicinity.

Having practiced all those circular motions, I moved on to the narrow stop border and did more circles.  Organically, don't you know.


My outer border was a wee bit ripply, I noted as I was basting it.  I fought the urge to remove and resew it and instead hoped it would quilt out.  A little meandering in that area seemed to do the trick. 

Then I went back to the frame borders in the interior and did a back and forth stitch.  I really like how that turned out.  After quilting down one side, I was in the zone and went on to finish them all in one sitting.


Finally, the little red patch.  I changed thread to red and quilted a little daisy with some pebbling (very organic, ahem) around the outside.


It took longer yesterday to hand bind the thing than anything.  I intended to machine bind it, but hand binding is sometimes what happens when you take too generous a seam.


After binding, it was time right away for pictures, since it was the perfect kind of overcast (plenty of light but no glaring sun).  Then the quilt was nap tested.  It passed.


You can see the quilting better from the back.  I had in mind a zen garden kind of thing, thus the straight lines, spirals, pebbles, etc.


The original plan was to quilt it somewhat differently, but after getting reacquainted with the quilt as I was pin basting it, an alternate idea took shape.


I don't have a clever name for this quilt, but I thought of this song.  To call a song a rag is one thing, but a quilt, well, no.  Anyway, both the song and the quilt make me happy!


Linking to:
August Finishes


Friday, June 14, 2013

From Doodling to Done

When I'm on the phone at work, I sometimes doodle free-motion quilting designs in an old spiral notebook.  Not while I'm having a conversation, but when I'm on hold for a representative, which can be a few seconds or minutes.  I flip past the work notes to a back page and start scribbling.

Lately I've been doodling ideas for quilting the Four-Lily block, which I wanted to finish as a table mat or wall hanging.  I came up with various ideas for the different sections.  Unfortunately, the notebook I doodled in stays at work, so last night I recreated it on a piece of freezer paper, with an eye toward getting the scale right. I traced my block templates onto the paper.
There was no way I was going to try to freehand quilt that elongated tri-lobed shape in the lily parts, so I grabbed a red Pilot FriXion marking pen and drew it right onto the fabric.  Then I made a few more reference lines (and screwed up others).  It was kind of a mess around the center.
But it worked to keep me (mostly) on track when I went to quilt it.  I think I've mentioned this before, but I sort of suck at following the lines, even the ones I draw to be followed.  Here is the "after."  The marks disappeared completely with the heat of the iron.
The quilting shows up better on the back.
And here's the full view of the front.
I had never used this pen to mark a quilt design before, so this was a first, and I'm happy with the results.  I know the marks can come back again with very cold temps, so I'll be sure not to set any ice buckets on it.

Now I am looking forward to starting something new, or at least working on something different for a while.  Maybe a string quilt? Quilt one of my UFOs?  We'll see.

If you'd like to try making this block, the tutorial for it starts HERE (or see the Tutorials tab above).  Have fun!

Music to ease you toward the weekend!


June Finishes


Tuesday, January 29, 2013

Heartbreaker with Happy Ending

Lessons learned quilting this wall hanging:
  • Things happen that are a mystery.
  • Sometimes I am not in the mood for a mystery.
  • Keep those big girl panties close, you might need them.
I stared at my quilt sandwich and drew imaginary lines with my fingertips, this way and that, trying to decide how I might go about quilting this piece. 


Every time I quilt something, I feel like a beginner.  Maybe once I get 10,000 hours under my belt, that feeling will have dissipated.  Guess I better get crackin' then.

I decided on loops and hearts within the hearts.  I made up a practice pad with a fused heart on it because I suspected those fused areas might cause my machine to cough up a hairball or something (I could not remember the specific experience I'd had that made me suspect this, but I suspect there was one). 

The test swatch went fine.  Cleared for takeoff, all systems go.

On the real piece, all seemed to be going well.  As I finished quilting the last (wouldn't you know) of all the hearts, I flipped it over again to check the back.  That's when my real heart sank.  Eyelashes everywhere!  Everywhere I had gone after that first heart, that is; except, oddly enough, a few of the other quilted heart shapes remained intact.  In my dismay, I neglected to take a photo.  It wasn't pretty.

Thus began a disheartening hour or two of ripping out stitches, Googling for answers, inspecting my machine (everything seemed okay, threaded okay, tension good), and trying another test (again, fine). 


I decided to forge ahead and quilt all the non-fused areas, which went well.  Then I went back and attempted to quilt the fused hearts once more.  Again with the eyelashes.  If I went super slow, a stitch at a time, and did nothing fancy, just get in and get out, it was doable (albeit not much fun).  

But at least it's done.  And points for perseverance, because I considered shelving this until February 2014; then I found my big girl panties.


All in all, I'm happy with the finished wall hanging. Happy I got through it, happy it's presentable.
Make A Candy Heart
It's a bummer the fusible parts were so dicey, and a buzz-kill for any fusible applique in my future.  Has this sort of thing ever happened to you?  I used Heat 'N Bond Lite, which is supposed to be sewable.  My machine is a Juki TL98Q, and the thread (which I am admittedly not in love with but I used it anyway) was Isacord both on top and in the bobbin.  I did not change my needle, but it had been recently changed.


So that's the breakdown.  Time to enjoy it on the wall!

January Finishes

Saturday, March 17, 2012

A Patch of Sun Finished!

A few weeks ago, while my daughter was visiting and we were chatting, she arranged some yellow and white half-square triangles together on the living room floor and came up with a cool design (see post here).  I then sewed them together and dubbed it A Patch of Sun.  
This past week, I practiced my free-motion quilting for this month's challenge by deciding to try some loopy daisies on A Patch of Sun.  I doodled a bit on paper, then went right to the machine.
First I did a couple daisies on a practice piece.  Those had five petals, but for some reason when I started on this, I was making four bigger petals and just stuck with it.  Maybe I had four-leaf clovers on the brain? 

I used a yellow Sulky thread that was already on the machine and a white Isacord thread in the bobbin.
The back is a D9P (disappearing nine-patch), which in this colorway is also known as an EEB (exploding Easter basket). ;)

You like bright?  Ka-boom!  There you go!

So there you have it: 

A finish for the week for Can I Get a Whoop Whoop...


Practice for the FMQ Challenge 2012 this month... (having trouble inserting the HTML code for that; button on sidebar).


And A Stitch in Time 2012 finish for March. In light of recent events, it may be my only March finish, but we'll see.


March Finishes


At any rate, I now have this hanging in my entryway and will enjoy the happy glow of A Patch of Sun for a while!