Showing posts with label drunkard's path. Show all posts

Monday, December 22, 2014

Plaid Circles Quilt

I'm still mulling over a name for this quilt, as you may gather by the generic post title.  Meanwhile, I finished binding it yesterday and, other than a proper name and label, it's done!

It's from a pattern called Dad's Plaids by Elsie Campbell in her book String Quilts.

It started with sewing strips of thrifted plaid shirts into a strata, then cutting that into the drunkard's path block and border pieces.

I really enjoyed making this quilt, working with such a variety of plaids, assembling light and dark strips into the strata, and pretty much every step in the process.

Quilting it, though?  Well, I left that to an expert, Melissa of Sew Shabby Quilting.  She did a wonderful job of an overall interconnected squares pattern, which you can see a little better on the back.
I think it complements the plaids very nicely! 

It's hard to photograph a quilt in the house on some of the darkest days of the year.

Nevertheless, I gave it a shot (or a dozen and a half, as the case may be).  I like what the "Lomo-ish" effect does in Picasa.  You can really see the red and orange hot spots pop.  Hmm...another quilt name idea?  Hot Spots?

Norm has claimed this quilt for himself.  He says it reminds him of circuit boards.  I think we will have to share it, though.  Maybe whoever gets to the couch first calls dibs.

Cross the Drunkard’s Path Quilt Along
This was the quilt I made during the Cross the Drunkards Path Quilt Along, so I'm linking up over at Field Trips in Fiber.

Thursday, October 30, 2014

Drunkard's Path Quilt Along - Week 4

There's something to whoop about today—I got the plaid drunkard's path quilt top sewn together this past week!


It went together really well.  I did any necessary trimming to size/squaring up, block by block, as I sewed each row. 

Turns out I needn't have worried about pressing all the quarter circles one direction (toward the circle).  It worked just fine to sew over that seam, and there was no shifting, thanks to strategic pinning and then using my trusty seam ripper, flat side down, to compress the bulkier seams as they went under the presser foot.  No broken needles either, ha!


The full shot was taken with me standing on a chair and holding the camera up almost touching the ceiling.  What we do for our quilts, huh?


It will finish at 72 x 90 inches.  I love it!

It still needs a few things:
  • Backing - Have to see what I've got in the stash.
  • Quilting - Going to send this one out.
  • Binding - Thinking of using more shirt scraps for the binding.
  • Name - Considering "Plaid Portholes" or "Portholes in Plaid," but I reserve the right to change my mind, and your ideas are welcome.
And a label, I almost forgot!  I have been really bad about labeling quilts lately.  I need to label probably a dozen finished quilts.  That sounds like a winter project, doesn't it?  Good thing there's this blog to remind me of the details for each one.


As I have mentioned before, I used the pattern "Dad's Plaids" by Elsie Campbell for this quilt.  It appears in her book String Quilts.  You can also see a video of Elsie Campbell showing how to make this quilt on QNNtv.com, HERE.  A subscription is required; I bought the monthly subscription for $2.99, well worth it just to be able to watch this video, but it also gives you access to hundreds more.


And as a final bit of random, how about a photo of the full moon earlier this month.  It was so bright and clear to the naked eye, but my camera couldn't quite capture that image. Ah well, I think it's kind of cool anyway, through the creepy tree and all.  Happy Halloween!

Linking to:

Cross the Drunkard’s Path Quilt Along


Friday, October 24, 2014

Drunkard's Path Quilt Along - Week 3

This week I've gotten all the Drunkard's Path blocks sewn, as well as the 9.5-inch blocks cut from strip strata that make up the outer borders.
Cross the Drunkard’s Path Quilt Along
The whole thing is on the design wall now, ready to be sewn together.

I should say most of it is on the wall; some of it had to go onto the floor, etc.  I wanted to see the whole thing laid out, as best I could.

That's my little portable design board leaning up against the wall.  It has come in handy to transport pieces from one room to the next, keeping them in the right order for sewing.  It'd be easy for me to get turned around with these directional pieces otherwise.

I hope to have a finished quilt top by next week!

P.S. - As usual, I am excited by the scraps I have left over.


Maybe something like this will go on the back as the basis for the label?

Saturday, October 18, 2014

Drunkard's Path Quilt Along - Week 2

My progress on the Dad's Plaids quilt this week included getting what I thought were all the curved pieces cut.  Somehow while laying it out, however, I came up short.

(Ha-ha!  The people who know me in real life are thinking that's a first.  It's land of the giants up in here.  This one can't count.)

Besides making more strip strata to address said deficit, I also decided I needed a design wall.  One that is perpendicular to the floor, that is.  I have, up until now, laid all my quilts out on the living room floor.  I did make myself a small portable flannel board (out of a foam-backed Marjolein Bastin print and a flannel sheet from Goodwill, if you're wondering), which I can prop up here or there in the sewing room and fit a couple of blocks on at a time, but it's pretty small.  Not a wall, in any case.

So I cleared a wall in the laundry room, which is around the corner from the sewing room.  The lighting isn't great, but it'll have to do because it's basically the only option available. 
I bought a couple yards of flannel-backed tablecloth vinyl from Jo-Ann with a 50% off coupon ($6 total) and a package of push-pins.  This is probably a temporary thing until I can do a proper job of covering a couple large pieces of insulation foam with batting and Velcro that system to the wall.  Also, I should repaint the wall.  As well as I procrastinate, you should look for that in, oh, 2016.  Maybe.

Here are some of the DP pieces laid out on the wall.  With all the variety of color and light/dark stuff going on, I knew I'd have to play around before I sewed anything together.  In general, though, I like where it's going!

I have to modify a few pieces where there's a light or dark strip in a particular spot where there should be the opposite (see circled areas below, for example).  

I knew they were there when I cut the pieces out, but I wasn't thinking it'd be a big deal and would add interest.  Turns out some are a little too interesting and my eye is drawn to those areas.  So a little seam ripping and resewing is in order.  No biggie.

I have around 18 DP blocks sewn together so far.  You know what?  I love sewing curves!

Cross the Drunkard’s Path Quilt Along

Saturday, October 11, 2014

Drunkard's Path Quilt Along - Week 1

Cross the Drunkard's Path Quilt Along is being hosted by Vicki Welsh at Field Trips in Fiber.
Cross the Drunkard’s Path Quilt Along
This is my progress post for the Dad's Plaids quilt I'm making.  This is a pattern by Elsie Campbell in her book String Quilts, using thrifted shirts for the fabrics.

I finished sewing the shirt strip strata (plural, as there are several couple-yard-long pieces), with each strip about 22 inches long and between 1.75 and 2.5 inches wide, alternating dark areas and light about every 10 inches or so in the strata.

Then I starched the strata.  I'm not a big spray starch user normally, but with these shirt fabrics of various weights and flimsiness, I understand the importance of starching for this quilt.

I used a tip about covering your ironing board with freezer paper if you don't want to mess it up with loads of starch, and I did that.  Worked great!  You lightly press the freezer paper on and the heat melts the wax on the back of the paper just enough to stick it to the ironing board so it stays put.  I also put an old sheet down under my ironing board to protect the carpeting from any over spray.  It's enough I have to vacuum once in a while, you know?


Then I made freezer paper templates for the Drunkard's Path block.  It sounds like it'd be a fiddly thing to do but, conveniently, a sheet of freezer paper is 18 inches wide, so you can cut two 9-inch squares from the width of a sheet, then trace an arc 6 inches from the corner along one right angle.  You cut these pieces out and position them on the strata, allowing for a 1/4-inch seam allowance all the way around.  Press them down and then cut out the pieces.


It's not a fast process, but I like taking my time with positioning and cutting. 


So far I've got—well, I don't actually know how many—cut out.  Quite a few, but not all, probably not even half.  The freezer paper templates are reusable several times before you have to make new ones.


This is how four blocks will go together for this quilt.  I don't have a whole lot of variety in this sample because I haven't cut out all the pieces yet.


Once they're all cut, I'll lay out the quilt on the design wall (or floor, as the case may be) before sewing it together.  But just to get an idea of how it is going to go, with all those many seams in the strata, I sewed two block.  I pinned in a couple places and took my time, using the flat edge of my seam ripper as a stiletto when necessary to keep the edges together as it went under the presser foot, and they turned out fine.


Which way do you press your DP curve?  This pattern suggests pressing it toward the smaller curved piece.  I wonder if that will cause any grief when sewing the blocks together (since they won't butt together if they're all pressed the same direction).  Guess I'll find out!

Sunday, October 5, 2014

Sunday Sundry 10-5-14

Here a job, there a job, everywhere a job-job.
E-I-E-I-O.

One thing leads to another around here lately.  I start to paint, and I notice a lot of old paint and stain that needs to be disposed of.

The old paint that needs to be disposed of is located in a very messy workshop that needs cleaning and organizing.

The workshop that needs cleaning and organizing is also where my treadmill is.

The treadmill needs using again because it's getting too cool (and dark earlier) to walk outside.

I need a distraction while on the treadmill, so the television needs moving from the sewing room to the workshop.

The workshop needs cleaning before the TV is moved.

And so it goes, around and around and doubling back on itself.  This leads to that, and that leads to another thing.  Stuff is getting done, though, including some long-procrastinated-on, time-sucking, dumb jobs. There is also a growing donation pile.  I did a big purge about two years ago in the fall.  Something about this time of year gets me wanting to clear out.

Finishing the table was not a dumb job.  I put the last coat of polyacrylic on it this morning.


I learn, and relearn, as I go with table painting.  Overall, it has come out fine, but mistakes were made.  If you ever come to my house and volunteer to do laundry, I will be happy to point them out to you.


(The lighting makes it look more orange sherbet-y than it really is.)
One job was not even on my radar until my daughter, while helping me get started on cleaning the workshop, found an old broken putty knife, which she (quite reasonably) wanted to throw away.  I stopped her from doing that, however, because...well, because Pinterest.


(Image Source)
I'd seen this image on Pinterest, some cool art made with old putty/spackling knives and photo images.  This seems a doable craft, given that I have a couple old putty knives (albeit broken) and a ton of old photographs.


But this particular post is not about doing something artsy with Mod Podge, sorry.  Besides, I threw that old jar away in the workshop cleanup.

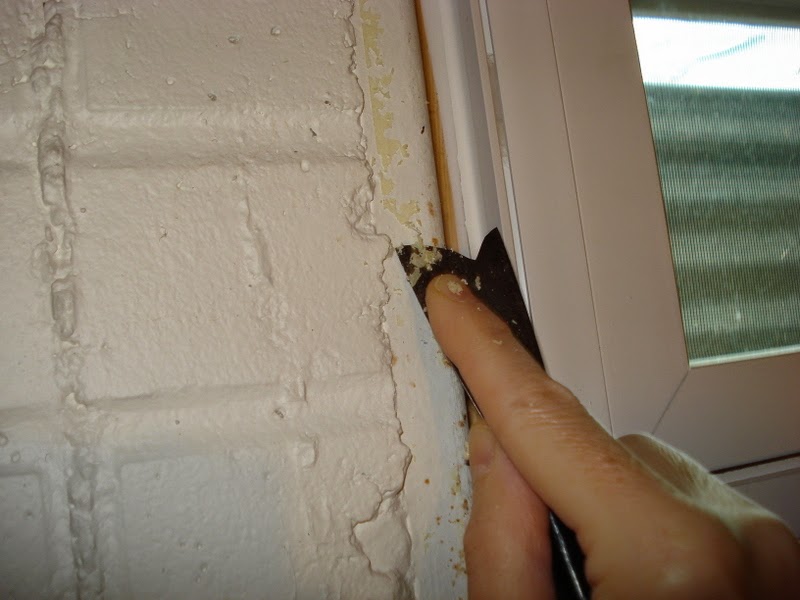
So I'm standing there in the basement handling this broken putty knife and I notice that broken edge is pointy and sharp and thin, and—hey, Macarena!—maybe it could scrape off something super stuck on, like the ancient stuff adhered to (and seemingly one with the very molecules of) the basement window casings.  Are they called casings?  It's the metal part that sits in the concrete and holds the window.

The old basement windows had been leaky, so the previous owners, about 20 years ago, had used an airtight window sealing film over them.  We had the windows replaced probably six or seven years ago.  The strip of adhesive left after the film was removed turned out to be extremely tenacious.  A regular putty knife didn't budge it and I gave up trying years ago.  Yep, years.  I am the Queen of Procrastination, especially when it comes to dumb jobs like that.

But when the universe finally hands you the right tool for the job...


I was almost giddy, actually, at how well it worked.  That sharp pointy edge got right up under the sticky strip and cut through the gunk that had melded it to the underlying surface.


There was still ample elbow grease involved, as well as some Goo Gone once the majority of the adhesive was removed with my special tool.


But over the course of a couple days, the removal work was done on all the windows.  Now I just have to paint the casings with some Rustoleum and that job will be history.

In With the New
I took advantage of a 50% sale off already marked down fabric at the hometown Jo-Ann store recently.


They had a pretty nice selection so I loaded up the cart.  The stash had been lacking in the blues and low volume department, in particular. 

I picked up a couple black and white pieces as well, including six yards of the Alexander Henry one in the background here with the large scale print.  That will make a nice backing for something down the road.


Between other things, I sewed more plaid shirt strips.  I think I have enough strata made to start cutting the pieces. 


Since the Dad's Plaids quilt I'm planning uses a drunkard's path block, I'm going to join the Cross the Drunkard's Path Quilt-Along at Field Trips in Fiber.  I need all the motivation I can get these days, and it should be fun!

Cross the Drunkard’s Path Quilt Along

Tuesday, August 26, 2014

Next Up

As I sat down to write this post (which will eventually be about an upcoming project I hope to start soon), I started to recall a dream I had last night.  It involved a strange thrift store display—more like a sculpture or art piece—comprised of dozens of vintage sewing machines welded together in a circular pattern, kind of like a gigantic mobile or chandelier made of many different makes and models, colors, etc. 

The piece was suspended from the ceiling (the store itself was like a very big pole shed or barn or maybe an airplane hangar, someplace with a high industrial-type ceiling).  Everybody else in the store seemed to be ignoring it completely, going about their usual shopping, but I was fascinated and intensely curious.  I looked around again and realized my mom was there (this is the second dream I've had this week about my mom and something sewing related; she passed away in 2009, but it's always a nice surprise to see her in my dreams).  I asked the people in charge of the store about the sculpture and found out they actually wanted it taken down, and if we wanted to remove it, we could have it and all the machines that were part of it. 

My mom didn't seem all that interested at first, so I had to fill her in that since she'd been gone, vintage machines like those had become more popular with collectors/sewists, and that I bet we could separate them and sell them on eBay.  I did a quick mental tally and somehow came up with a figure of 10 grand in machines suspended above us (yeah, right...in my dreams!).  Of course, there was the issue of whether or not any of them were in working order or even had motors and/or their requisite parts, but I was willing to take a chance.  All we had to do was come up with a plan for removing them.  Mom was always a good problem solver, and I was confident that between the two of us, we'd figure something out.

The next thing I knew, I was lying face up on an open moving platform lift, rising higher and higher toward the ceiling and the monstrosity of machines.  Did I mention I'm not particularly keen on heights?  And that this was an open platform, as in no side rails?  And that it was wobbling?  Which explained why I was apparently frozen flat on my back, feeling that I did not dare even sit up to get my bearings lest the thing start swaying more, and I sure as heck didn't want to look down.
High Steel Heroes, c. 1932
Maybe I underestimated the logistics involved in accomplishing this feat.  Just a tad.

Things got fuzzy after that, but it was with relief that I woke up on the low platform of my own bed, safely back on terra firma.

* * * * *
Well, there is little more down to earth than men's plaid shirts, and I've been up to my armpits in them this past week. 


(Before)
Specifically, I have been cutting them apart for a quilt project I'd like to get started on.


Over the past couple of months, I've been picking up a few men's plaid shirts here and there at the thrifts, having in mind to make the string quilt, "Dad's Plaids" from this book by Elsie Campbell.


I first saw this quilt on Pinterest and tracked down the pattern and book from there.  It is one of my most re-pinned pins (trumped by Ian Somerhalder, however), so apparently a lot of other people are enamored of it as well.  If any of you have made this quilt or are planning to, I'd love to know about it in the comments.


Anyway, I think I have enough shirt fabrics now to get started, although I haven't taken a complete inventory (oh yes, there are more in the stash) and something tells me I may still be in need of light colors.  But I'll sort all that out in due time.


Did you know there is a lot of fabric in a XL or XXL men's shirt?  As far as the deconstruction process, some may find it a tedious proposition; fortunately, I am one of those people who has always loved cutting things with a good sharp scissors.  After all, I apparently remodeled my mom's best girdle into a "cheerleader skirt" with a pair of her sewing shears and gave myself my first self-haircut by age three, so I think it's fair to say it's a predilection I was born with.


(After)
And because I am in a tangential mood, and I like this song, and the heights dream reminded me of it...