That's not a trick question; I really would like to know.
I thought it was called bejuga or begosa or some other strange b-word, but Google has no idea what the horticulture I'm talking about.
Anyway, it's pretty. It grows on the north side of the house where there is not much light due to the neighbor's shrubbery. Looks like something likes it as much as I do, judging from the chewed up leaves.
And more tulips came up!
This, however, came down:
We were talking about taking it out anyway. Mother Nature took care of it for us yesterday. It was really windy.
My Dresden plate test sample number two worked out last night. No pictures because it was just out of icky scraps. I'm ready to cut out and sew a proper one now.
There's more going through my head than my sewing machine this week.
It's all good, though.
Like this chocolate cake. And I'm about to eat that lovely piece pictured above as soon as I'm done here. It needs a little more time to thaw though.
I made it last night, ate a piece (or two), then froze the rest. So I wouldn't eat any more.
Yeah, like that works.
Also last night, I tested my homemade template for the Dresden plate block, loosely based on my mom's that I talked about earlier this week. It came out a little too big and didn't want to lie flat. I think I know why. I tweaked my template and will try another one this evening, if I have time.
I also tweaked my blog layout a bit so hopefully youtube videos won't be cut off along the right side. Here, let's test it out.
Damn, this guy can sing. Brandon Boyd. The band rocks too.
Great idea, Kristen! I've always wanted to try this block. I think we're checking in with fabric choice this week, which I'll get to in a minute.
First, I want to tell you about the Dresden Plate quilt I had as a child. My mom made one for my sister Nita and then one for me a couple years later. Nita and I shared a bedroom and had those quilts on our twin beds from early on. Mom called it a sunflower quilt. She made ours from scrap fabrics in the petals or blades, red centers, and a white background. Her background was pieced, not appliqued. I spent hours and hours gazing at that quilt I slept under. I loved looking at the various fabrics and thinking about what dress, blouse, or other sewing project the scraps had come from. There was every color and print imaginable in the petals. My favorites were the paisleys. It was the 1960s, after all.
My sister's quilt went with her to California. She eventually moved back to the Midwest, but her quilt didn't. Mine was still at home when I got married and moved away. Then my parents moved to another state. Nobody seems to know what happened to my sunflower quilt. It's gone missing or just plain gone.
But something else turned up.
Last year, after Mom passed away, I was looking through her things and found a letter she had written, but never sent, to a family friend whom she called Aunt Lillie, though she wasn't related. Aunt Lillie had helped deliver my mom when she was born, in January 1937 (they had sent for the doctor, but he was delayed due to an ice storm). Aunt Lillie was also a quilter, and Mom's letter to her enclosed the pattern to the sunflower quilt she had just made for my sister. The letter reads:
October 24, 1961
Dear Aunt Lillie,
Since the weather has started to turn cold, I have had out my quilting. I am finishing my sunflower quilt and I remembered that I told you I'd send you the pattern and a picture showing how to set it together.
I'm finished with mine just about and it's real pretty. I used red in the centers and to strip it together with. I used white to fill in the corners and points. This one I'm making for a twin bed for [Nita]. I did almost all of it on the machine. I'm sending the pattern and picture I've drawn and hope it helps you get yours together.
I've got just all kinds of quilt patterns if you want some new ones. I'm going to order a quilt pattern book today so I will have all I ever want. Ha. I'll try to get some of the prettiest ones traced off for you.
My family are all fine. The girls are both growing and getting into everything. The baby [me] talks already and tries to say everything. She's almost as big as [Nita] except [Nita] is taller by 3 inches. I use the same size dress pattern for both of them...
She went on to talk about other things in the letter. She included her template pieces traced and cut from construction paper and a drawing of how she set her quilt. I don't know why she never mailed the letter, but I'm glad she didn't. Thanks, Mom.
I will probably use a modified version of Mom's pattern for the sew-along, and I'll applique it. I'm not up for piecing all those curves right away, but I will try her original pattern later.
So, here are the fabrics I pulled from my stash for the first block. Some new, some vintage.
Not sure how many different fabrics I need, and I haven't decided on the color of the center circle or background just yet. But I like surprises. We'll see what pops up.
Want to join the fun? Head over to Sew Happy and find out all the details!
Ever wonder what your neighbors are thinking as you're adorning the arborvitae?
How about when you're perching your Pyrex?
Snapping your snacks?
Flashing your fabric?
No?
Huh.
Made a few more Little Dresses this weekend. Got a chance to use some of the lime green Moda fabric I found at Goodwill recently.
I think it's a wrap for me on this project. I've made 5 dresses. Julie's made 5 so far and will be making a couple more, plus she's going to make some Little Britches, or shorts for boys, as well.
Did some thrift shopping Saturday and found this vintage tulip fabric. Okay, I don't know for absolute certain it's vintage, but it's only 36 inches wide, so that's one clue, and the colors have that muted funkiness to them. Rust colored tulips? I'm thinking late '60s, early '70s?
So I'm standing there in St. Vinny's, perusing the old fabric, and it's pretty quiet in the store except for the tinny speakers that are playing something straight out of Napoleon Dynamite. The scene when Pedro and Napoleon are shopping the thrift store and find the suit he's going to wear to the dance. It was surreal, I tell you.
Come to think of it, Napoleon's suit was about the same color as these tulips.
Sweet.
The Pyrex bowls are from the antique mall visit last month, from two different booths. I heart turquoise and red. Can you smell the potato salad?
And speaking of food, Emerald Cocoa Roast Almonds are heavenly! When you've got to eat gluten-free and dairy-free like me, you rejoice in finding a new snack that tastes so good.
Earlier this week, I stopped in to visit my friends at the office where I used to work. While I was there, Julie, who also enjoys sewing, mentioned a charity project she'd read about in the Nancy's Notions catalog. Little Dresses for Africa is a non-profit, Christian-based relief organization. Simple dresses made out of pillowcases (or your own fabric) are distributed through the orphanages in Central Africa. Nancy's Notions is participating in this effort and selling a kit to make the dresses, or you can download the free PDF pattern from their site. They will ship completed dresses to their destination if you mail them to Nancy's. In my case, I'll just drive them across town to the store.
It seemed like a worthwhile cause, with a local connection, so Julie and I have jumped in. Here's what we had done as of Thursday afternoon.
I made the two dresses on the ends from stash fabric. Julie's, in the center, is from a pillowcase, which she embellished with cute yellow scrap fabric.
These are so fun to make! We're each planning to sew at least a couple more.
I'll be linking again this week to Sew & Tell Fridays at amylouwho. Can't wait to see what everyone else has been up to!
I had to Google how to spell homestretch (one word or two), and it's a racing term, of course. Did you know the Kentucky Derby happens next Saturday? I did not. Want to test your knowledge of the Kentucky Derby? Click here for a quiz. I got 5 of 10 correct, which is funny because I guessed at every single one.
Back to DPSQ:The Final Chapter. Let's sew this thing together, already!
We will be making 16 large pinwheel blocks, each consisting of four of the block units that you made in Part 3.
Step 1: Take four random block units that you made in the Part 3, and arrange them into a pinwheel.
Sew the top two block units together, then the bottom two. Press seams toward the red pinwheels. Since the paper has been removed and there are no more bias edges to worry about, I used a steam setting on my iron at this point, being careful to press gently and not stretch the pieces.
Step 2: Sew the two 2-unit sections together to make a block. Again, you will be pressing seams toward the red pinwheels, but first I am going to tell you how to do a little trick in the center of the horizontal seam you just sewed to make it lay flat. Working on the back of the block, unpick 2-3 threads in the center on two of the seams, and open the center (you should see a tiny pinwheel in the center). Finger press this area flat, then gently press with your iron on both the front and back of the block.
(Back of Block)
TIP: When sewing your two block units together in Step 1, don't backstitch the ends that will be in the center of the pinwheel block. You'll be less frustrated when you have to unpick a couple threads there in this step. Ask me how I know.
Repeat Steps 1 and 2 for all blocks. You will end up with 16 pinwheel blocks, each 15-1/2 inches square.
Step 3: Cut sashing strips and outer border from your remaining 3 yards of red fabric as follows:
Cut 10, 1-1/2 inch strips x width of fabric (WOF).
From the 10 strips you just cut, cut 20, 15-1/2 inch segments. These will be your vertical sashing strips between the pinwheel blocks.
Cut 4, 1-1/2 x 68-inch strips from LENGTH of fabric (LOF). These will be your horizontal sashing strips, above and below your rows of blocks. Your rows will be approximately 65 inches across, but we'll cut the sashing strips a bit longer and trim as needed.
Cut 4, 6-1/2 x 85-inch strips from LENGTH of fabric (LOF). These will be your outer borders. Again, we're cutting them a bit longer than necessary.
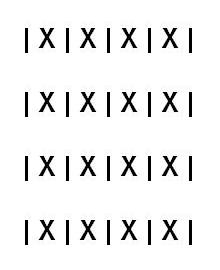
Step 4: Arrange blocks into four horizontal rows of four blocks each. Sew each row of blocks together with vertical sashing strips between blocks and on left and right ends of row as follows (where |=vertical sashing strip and X=pinwheel block):
Now, cut me some slack here; I don't have any other program (that I comprehend) to illustrate this, so you get my mad Paint grafik skilz.
Press seams toward red sashing strips.
Step 5: Sew long horizontal sashing strips between each row and at top and bottom as follows (where ------- = horizontal sashing strip):
Press seams toward red sashing strips.
Step 6: Cut 8, 2-1/2 inch strips x WOF from blue fabric for inner border. Join two strips end to end with a straight 1/4-inch seam. Press seam open. Repeat this with remaining strips so that you have 4 long, 2-1/2-inch strips for inner borders.
Step 7: Attach a blue border strip to the left and right sides of quilt top. (You all probably know how to measure for and attach borders, so I won't go into detail about that here.) Press seams toward blue border. Then attach a blue border strip to the top and bottom of quilt top. Again, press toward blue border.
Step 8: Attach red outer borders in the same manner as Step 7, i.e., to the left and right sides, then top and bottom. Press toward red border.
Step 9: Layer with backing and batting; quilt and bind as desired.
There's one more important step: Stand back and admire your beautiful quilt! Hooray! You deserve roses!
Anyone for a mint julep?
* * * * * * * * * * * * * * Questions, comments, noted errors/omissions? Let me know, and I'll do my best to clarify.
This is my favorite part--the part where we piece the string units of the Double Pinwheel String Quilt. The part I actually did in between the other parts because I liked it so much. The relaxing and fun part. Have I used the word "part" enough in this paragraph? Part, part, part, part. Okay, I think so. Part.
Basically, you just sew, flip, and press until your paper is covered.
Paper? Yep, we're going to piece these on lightweight paper, which will be removed later while you watch Pride & Prejudice for the umpteenth time--or maybe that was just me. Phone book pages work great for this.
What kind of fabric for the strings? Anything your heart desires, just keep it 100% cotton. I used scraps. I think the beauty of string piecing is in the randomness. That means if you're an overthinker like me, you get permission to dial down your brain and just grab and go.
Let's get this party started!
Step 1: Cut a variety of fabrics into strips, or "strings." (I'm going to use those terms interchangeably here). Your strings should be between 1 and 1-1/2 inches, generally, just make sure each string is a uniform width from top to bottom. We are going to sew the strings on straight, not wonky. (Nothing against wonky; I just have a feeling it wouldn't work well here. If you try it and it rocks, by all means, let me know.)
Step 2: Grab your phone book and carefully tear out 32 pages. Trim each page to 8-1/2 inches square.
Step 3: Take one of your strings and place it right side up in the center on the diagonal of the paper. To keep it from shifting when you sew on the next string, pin along the left edge of the center string. This is probably the only pinning you'll need to do, just on this center string before you sew the first seam.
Step 4: Take a second string and place it face down (right sides together) on top of the center string, matching the right edge. Cut your fabric strip so it extends just a bit beyond the paper where you'll be sewing it on. Using a 1/4-inch seam, sew through both fabric and paper along right edge.
TIP: Use a shorter than usual stitch length when sewing the strings. This perforates the paper closer together and makes removing it easier. Backstitching at the beginning and end of your seam also helps keep the stitches from loosening at the edges when the paper is removed.
Step 5: Remove the pins on the center strip. Open the strip you just sewed so the right side is up, and press seam with a dry iron (no steam).
Step 6: Repeat this process on the opposite side of the center strip. Add a strip, stitch, flip open, and press.
Continue adding strips until the paper is completely covered.
Step 7: Turn fabric-covered square over and trim to 8-1/2 inches square, using the paper as a guide.
Step 8: Cut your string-pieced square in half, on the opposite diagonal as the strings are pieced, from corner to corner. Your ruler should be at a right angle to your seams, in other words.
You will end up with 64 string-pieced triangles. Aren't they pretty?
Now we're going to sew the string-pieced triangles to the blue and red units we made in Part 2. Leave the paper on yet for the next step. It helps stabilize the seam you are about to make.
Step 9: Pin a string-pieced triangle and a blue and red unit, right sides together, along the long edge of the triangles. This is a bias edge on the blue and red unit; try not to stretch it as you're pinning. Stitch.
Press seam toward blue and red unit.
Step 10: Remove paper from back.
TIP: It helps to fold the paper back against the stitching lines before gently tearing it away, like removing a check from a checkbook. This is a good project to do while watching TV, pretending to listen to your spouse or kids, etc. Not while driving though. Or bathing.
Step 11: Trim each one to 8 inches square.
TIP: Position the unit for trimming on your mat as shown, and trim the red pinwheel side (right side) first, then the lower edge. For some reason, this seemed to work best.
When you're done, you should have 64 of these for your quilt.


 I thought it was called bejuga or begosa or some other strange b-word, but Google has no idea what the horticulture I'm talking about.
 Anyway, it's pretty. It grows on the north side of the house where there is not much light due to the neighbor's shrubbery. Looks like something likes it as much as I do, judging from the chewed up leaves.
 This, however, came down:
 We were talking about taking it out anyway. Mother Nature took care of it for us yesterday. It was really windy.
 My Dresden plate test sample number two worked out last night. No pictures because it was just out of icky scraps. I'm ready to cut out and sew a proper one now.
.JPG)
.JPG)