
This is Part 1 of a tutorial for making the Four-Lily Block, inspired by a quilt made by my grandmother Lillian sometime around the late 1960s or early 1970s.
This tutorial will show you, step by step, how to make the Four-Lily Block. Let's get started!
 |
| Four-Lily Block |

This block consists of three fabrics: A background fabric (I used Kona Snow) and two other fabrics. You'll want some contrast and variety between the other two fabrics (light/dark; larger scale print/smaller scale). You don't need much fabric for one block; a quarter yard or fat quarter of each fabric will do. The block measures 16-1/2 inches square, unfinished.
NOTE: This tutorial was originally written in 2013 for
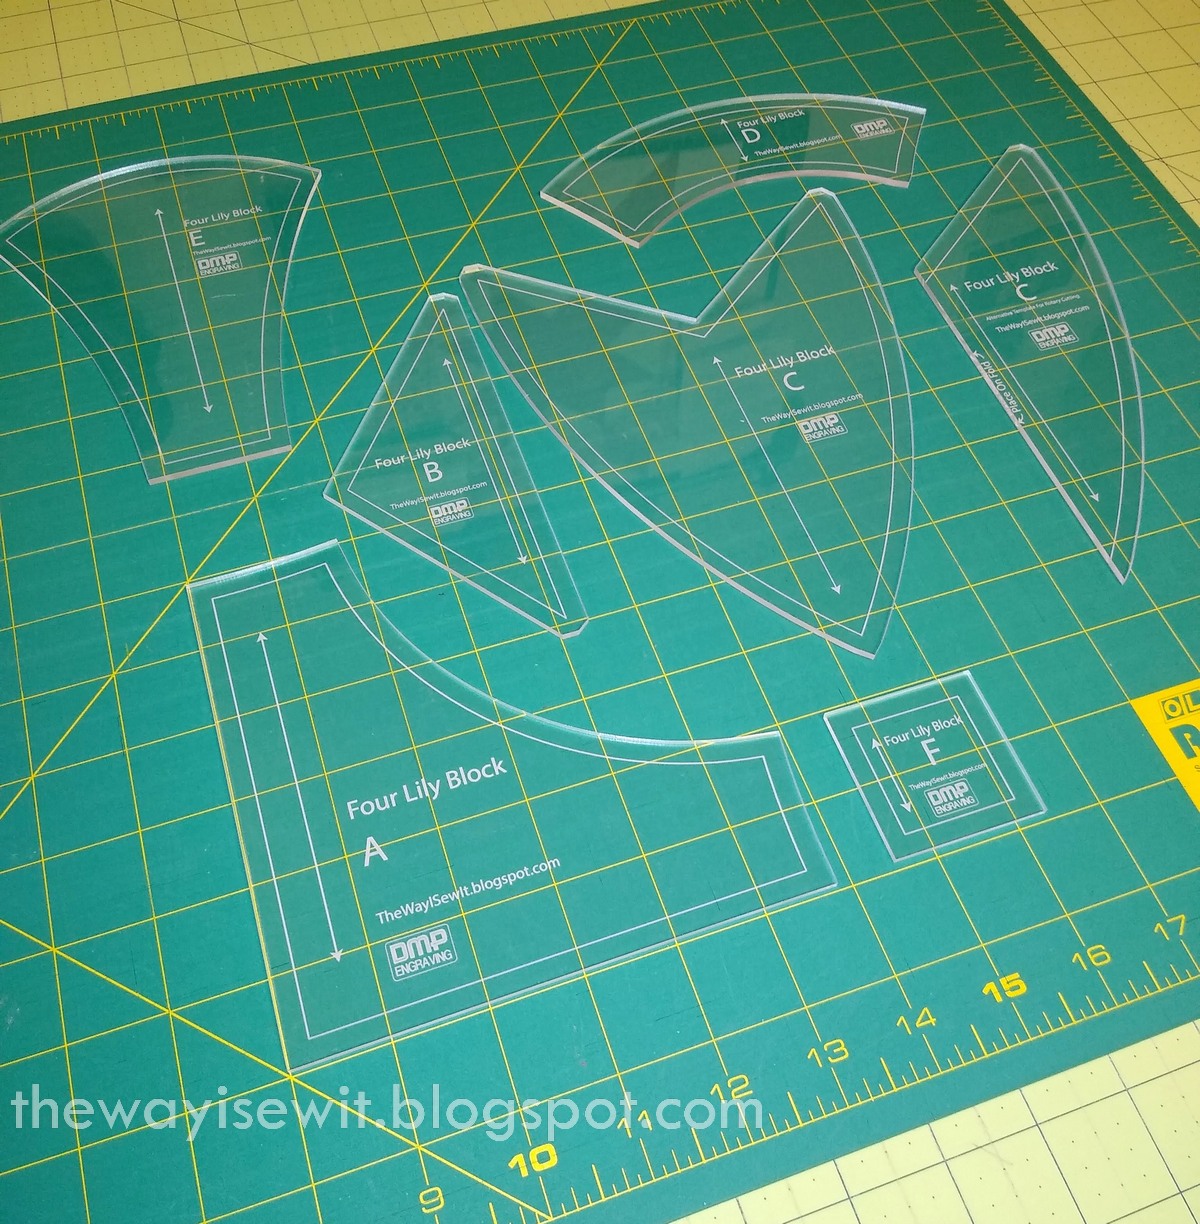
block construction using cardstock templates traced onto fabric. As of March 2023, custom acrylic templates
are available from DMP Engraving. The new templates make fast and easy rotary cutting possible for this block. I encourage you to check
them out!
If you already have the acrylic
templates, feel free to review Part 1 of the tutorial for general tips and
then proceed to Parts 2, 3, and 4 for block construction, including helpful tips for curved piecing.
You can also download the free PDF Four-Lily Block Instructions HERE.
Print the template pages at 100% (no scaling/actual size). Check for correct size after printing by measuring Piece F. It should measure 1-7/8 inches square, including the seam allowances. Cut out all six pieces along the outermost lines (the light gray lines), which includes the seam allowances. Notice the way those light gray outer lines are shaped a little differently at the pointy ends of Pieces B and C. Cut them as shown. Trace the paper pieces onto card stock and cut out your cardboard templates for Pieces A through F.
Press all your fabric. Use spray starch, if you like (optional).
Next, we are going to trace the templates onto the fabric. But first, some things to note:
- I used a Pilot Frixion pen for tracing onto fabric and also later when marking points used to match pieces before sewing. The ball point marks smoothly and the lines are clearly visible. With this type of pen, the ink disappears with heat, like that of an iron, so by the time you've pressed your block, the marks are gone. I highly recommend the Frixion pen for this job, but feel free to use a different fabric marker, if you desire.
- When I made the quilt and was cutting multiple pieces, I found it easiest to sub-cut the yardage into smaller width of fabric (WOF) strips and then trace the templates on those strips. I've applied that method to making this one block as well. If you're using a fat quarter, it will be just a little different, but the same principle applies, as explained below.
- For example, for Pieces A and B, I cut an 8-1/2-inch WOF strip from the background fabric. Keeping it folded selvage to selvage (double layer of fabric), I then traced Pieces A and B onto the background fabric. If you're using fat quarters instead of yardage for this block, the same method applies, but you would fold your piece in half so it measures about 9 x 20 with the fold along the longer edge. By tracing the pieces as shown, I could use my quilt ruler and standard rotary cutter to cut along some of the straight edges and cut the pieces apart. Once the pieces are roughly separated, you can then use a scissors to cut out the remainder of the shapes.
 |
| (Pieces A and B traced onto fabric - click to enlarge) |
 |
| (Cut along straight edges to separate, then scissor cut) |
- When you are cutting your template pieces from a double layer of fabric, take care that the fabrics don't shift as you're cutting, especially when cutting curves. You may wish to pin along the edges of the pieces after you've rough-cut them apart from each other. I did that at first, but then I found that if I just took my time and handled the pieces carefully, it wasn't a problem (and I didn't need to pin).
Next, you will need a total of 4 of Piece C and 4 of Piece D from your outer print fabric (the lily shaped pieces and the arcs that join them). Here's how I traced those onto my fabric, along with Piece F. You can see that I alternated the orientation of the pieces (up and down) for efficient use of the fabric. If you're using fat quarters, you will probably need to trace Pieces D and F off to the side instead of above Piece C.
 | |
| (Pieces C, D, and F traced onto fabric - click to enlarge) |
 |
| (Alternating orientation of pieces) |
The fabric is doubled, so tracing each piece twice yields the 4 pieces of each C and D needed. You only need 1 Piece F square per block.
 | |
| (Take care when cutting double fabric layers to prevent fabric shifting) |
The above photo shows where I've pinned along the edges on the uncut pieces on the right side (click to enlarge) to prevent the double layer of fabric shifting as the pieces are cut out.
Finally, you will need a total of 4 of Piece E from your inner print fabric. Here's how I traced that:
 |
| (Piece E traced onto fabric - alternating orientation) |

That's it - the cutting part is over! You have all the pieces you need to make a block.

Next in Part 2: Sewing together the four Corner Units. (Hint: We'll be "Thinking of U!")