
Hi! Piggy and I are going to show you how to make a Mini Zig today!

Piggy knows what a zig is—just look at her foot! She would also like you to know that the inspiration for this particular funky-colored mini came from none other than she herself, or as Piggy puts it, "Moi." That Piggy...such a trendsetter!

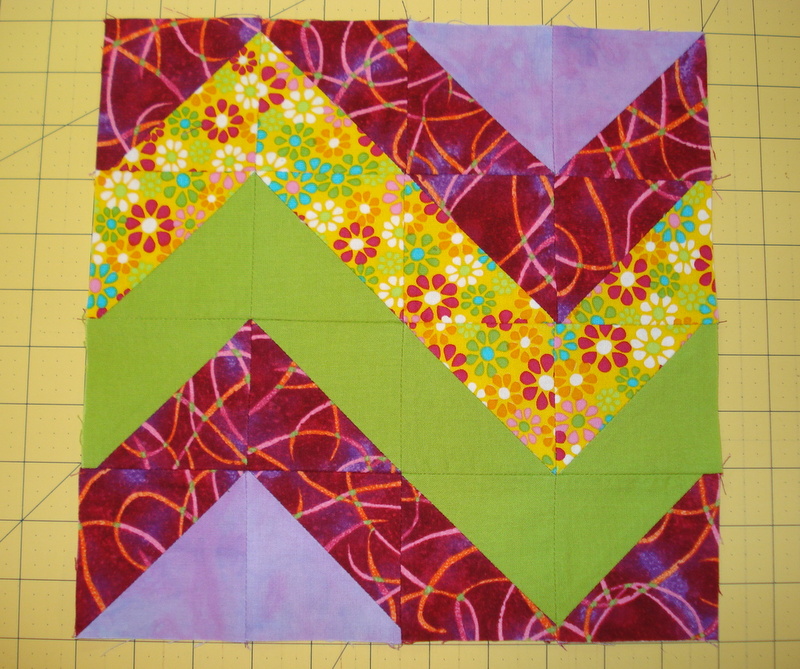
So let's get started. Here is the layout. This will make a mini measuring about 11 inches square.

Choose four different fabrics. You don't need much fabric at all, so this is perfect for scraps. Referring to the layout, decide how you want them to appear, i.e., which fabric will be your A fabric, B, etc.

From each fabric, cut 3.5 inches squares as follows:
A - Cut 2 squares
B - Cut 6 squares
C - Cut 4 squares
D - Cut 4 squares
Then sew the squares together in pairs, right sides together, to make half-square triangles (HST). Sew your squares together:
2 - A/B (in the example above, this is purple to burgundy)
2 - B/C (burgundy to green)
2 - C/D (green to yellow floral)
2 - B/D (burgundy to yellow floral)

You all know how to make these the easy way, right? Put the two fabric squares right sides together, draw a diagonal pencil line down the center, then draw lines 1/4-inch from either side of the center line. Sew along both of these outer lines and then cut the squares in half along the center diagonal line to make 2 HST squares.

After you've sewn all the squares into HSTs, press the seams open and trim the little dog ears from the corners. If you want to trim your squares, you can. Mine measured 3-1/8 inches at this point. If your center seam is a little bigger, you may want to trim them to 3 inches square.

Then lay the blocks out according to the diagram above.
And sew them together!
You will want to quilt and bind your mini. I haven't gotten that far with this one, but here is the one I finished the other day.

This mini (directly above) now belongs to Mom Wald, who gave me Piggy! What a sweetie! She has an eye for the coolest vintage stuff, and is about the nicest person you could ever meet. We had tea the other day in Madison along with her dear daughter and swapped stories (and some irises from our gardens). What fun! Piggy and I both left with big smiles.

13 comments:
Thank you, P! Tell Piggy I promise to load up a snap when I finish my Mini Zig. Happy Friday! :)
Thanks for the tute P. I've filed this one away to do when I have some spare time. Piggy is an absolute cutie!
Great Tutorial. This is such a cute mini quilt.
A fun tutorial for a very mini mini! Such a sweet little piggy =D
Cute as can be! Great tutorial:)
I'm in love with Piggie!! What a generous friend you have! <3
OMGoodness P! I found your previous post this morning, and was saving it on my computer to comment on tonight when we came home. Here you have a "how to zig zag" and Piggy too! You are so much fun.
We had a blast the other day. I was sad, that I could not be home to take photos and share my lovely surprise today.
Coming home in a chilly, gray rain to golden goodies on my table warmed my heart. Thank YOU!
(Me Thinks I need to do a mini zig zag too.)
Hey Girl! I am back and your tutorial is a wonderful way to catch up to checking out what you have been up to. I love the little pig and love your mini quilts. You always have such wonderful and bold color choices. Missed you!
Great tutorial and Miss Piggy is too cute!
I did it, P.! Thanks for your tutorial. I posted a snap on my blog. :) Happy Saturday!
Your mini zig is so sweet. And the piglet is adorable!! LOVE him/her.
I think zig mini #2 is even more fun than the first one! Love it! Thanks for the great tutorial!
xo -E
Excellent tutorial! Thanks! I recognize one of those fabrics. :)
Post a Comment